My nephew requested a Lilo and Stitch cake for his seventh birthday and looked at me with the specific kind of hope that only children and golden retrievers can produce. I had never decorated a character cake before. Three hours later, a blue and teal tropical cake sat on the counter and he cried the happiest tears I have ever witnessed. Genuinely worth every minute of the effort.
This Lilo and Stitch cake ideas birthday guide covers everything — the actual vanilla cake layers, the tropical buttercream design, the ocean and Hawaii-inspired decoration, and multiple approaches for getting Stitch onto the cake regardless of your skill level. You do not need to be a professional cake artist. You just need this guide and some enthusiasm.
Servings: 12 to 16 slices Prep Time: 45 minutes Bake Time: 28 to 33 minutes per layer Decorating Time: 1.5 to 2 hours Total Time: Approximately 4 to 5 hours including cooling
What You Need — The Complete Ingredients List
This Lilo and Stitch buttercream cake starts with a moist vanilla base with a tropical coconut twist. Here is everything for a two-layer 20cm round cake:
For tropical vanilla cake layers:
- 3 cups all-purpose flour, sifted
- 1 tablespoon baking powder
- 1/2 teaspoon baking soda
- 1 teaspoon salt
- 225g unsalted butter, room temperature
- 2 cups granulated white sugar
- 4 large eggs, room temperature
- 1 cup full-fat coconut milk, canned (not carton drinking coconut milk)
- 1/3 cup whole milk, room temperature
- 1/4 cup vegetable oil
- 2 teaspoons pure vanilla extract
- 1 teaspoon coconut extract
Vanilla buttercream frosting:
- 450g unsalted butter, completely room temperature
- 6 cups powdered sugar, sifted
- 5 to 6 tablespoons heavy cream or whole milk
- 2 teaspoons pure vanilla extract
- 1/4 teaspoon salt
The Stitch blue and teal color scheme:
- Gel food coloring in cerulean blue, teal, turquoise, and purple (for Stitch’s exact shade)
- Black gel food coloring (for outline details if painting)
- White gel food coloring (for highlights)
For the decorations:
- Stitch figurine topper (purchased from toy store or cake supply shop)
- OR Stitch printed cake topper on wafer paper (easiest approach)
- OR Fondant for sculpting Stitch features (advanced approach)
- Tropical sugar flowers in hibiscus or plumeria shapes
- Green fondant or buttercream for palm leaf details
- Edible blue and teal pearl sprinkles
- Toasted coconut flakes for texture
- Edible glitter in blue and teal (optional)
FYI, the specific blue color for Stitch requires mixing cerulean blue gel coloring with a tiny amount of purple — this produces the warm, slightly violet-blue that matches Stitch’s fur color accurately rather than a cold, flat blue that looks nothing like the character.
The Making Process — Every Step in Full Detail
Step 1: Bake the Tropical Vanilla Cake Layers
Preheat your oven to 175 degrees Celsius. Grease two 20cm round cake pans, line the bottoms with parchment paper circles cut to fit, grease the parchment, and lightly flour the sides. This three-step preparation creates a reliable release for both layers — particularly important when you need intact, level layers for a character-themed cake that needs to look polished from every angle.
Sift flour, baking powder, baking soda, and salt together into a medium bowl. In a separate jug, combine canned coconut milk, whole milk, vanilla extract, and coconut extract and stir together. Beat room-temperature butter and vegetable oil together on medium speed for two minutes until smooth and unified. Add a granulated sugar and beat on medium-high speed for four full minutes until the mixture looks very pale and genuinely fluffy — scraping the bowl twice during this time.
Added the four room-temperature eggs one at a time, beating for 30 seconds after each on medium speed. Add your dry ingredients and coconut milk mixture in three alternating additions on the lowest speed — beginning and ending with dry ingredients — mixing just until each addition disappears with no visible white streaks. The coconut extract and canned coconut milk give this batter a distinctly tropical aroma that feels completely appropriate for a tropical Stitch cake decoration ideas themed creation.
Divide the batter evenly between the two prepared pans, spread level, and tap each three times on the counter to release air bubbles. Bake at 175 degrees Celsius for 28 to 33 minutes until a toothpick inserted in the center comes out with just a few moist crumbs. Cool in pans fifteen minutes, invert onto wire racks, peel parchment away, and cool completely before decorating.
Step 2: Make the Vanilla Buttercream in Batches
Beat 450g of completely room-temperature butter in a stand mixer on medium-high speed for five full minutes until pale, whipped, and noticeably lighter in color. Do not shorten this beating time — extended pre-beating before any sugar is added is what creates the light, fluffy, spreadable buttercream that makes the difference between a professional-looking finish and a dense, heavy one.
Add sifted powdered sugar in three additions on the lowest speed. Then add vanilla, salt, and five tablespoons of heavy cream. Beat on medium-high for three more minutes until the buttercream looks smooth, bright white, and holds soft peaks reliably. This full batch of white buttercream serves as both the filling, the crumb coat, and the base layer of the decoration — all from one bowl before any coloring begins.
Reserve approximately one cup of plain white buttercream in a separate bowl before adding any color — you will need this white for highlights, wave details, and any areas of the cake design that need to remain white. The remaining buttercream gets divided and colored to create the tropical ocean and character color palette that defines this cute Stitch character cake design.
Step 3: Level, Stack, and Crumb Coat
Level both completely cooled cake layers with a long serrated knife — removing the domed top of each for flat, stackable surfaces. Place a small dab of buttercream on your cake board to prevent sliding. Position the first layer flat-side down on the board. Add a generous filling layer of plain white buttercream and spread evenly to the edges. Place the second layer flat-side up on top and press gently to adhere.
Apply a thin, even crumb coat of white buttercream over the entire exterior of the stacked cake. The crumb coat seals all loose crumbs against the cake surface and provides a clean base for the colored buttercream layers. For a Lilo and Stitch themed cake tutorial result that looks intentional and polished, a good crumb coat is not a step you can skip — the final colored layers sit directly on top of it and every bump or imperfection underneath shows through.
Refrigerate the crumb-coated cake for 20 to 30 minutes until the buttercream feels completely firm and cold to the touch. This chilling step prevents the final colored buttercream from mixing into the white crumb coat layer during application, which would muddy all the colors and create an uneven, streaky result.
Step 4: Create the Tropical Ocean Buttercream Background
Divide the remaining buttercream into portions. Color the one generous portion a deep cerulean blue mixed with a tiny amount of purple to achieve Stitch’s specific fur color. Color another portion teal. Colored a third portion turquoise. Keep the reserved cup white for wave and highlight details. This four-color palette — blue, teal, turquoise, and white — captures the Hawaiian ocean and tropical theme perfectly.
Apply the colored buttercreams around the exterior of the chilled cake in irregular, organic sections — teal at the very bottom, shifting through turquoise in the middle, and the deeper blue toward the upper portion and top. Use an offset spatula to apply each color in loose, overlapping patches rather than clean straight lines. The organic, uneven color distribution looks like actual ocean water rather than painted stripes.
Use a bench scraper held vertically against the side of the cake to smooth and slightly blend the colors together in one or two clean rotations of the turntable. The bench scraper motion blends the neighboring colors just enough at their edges to create a seamless gradient while keeping each color distinct in its section. This ocean gradient technique is the defining visual element of the simple Stitch cake at home look that everyone photographs immediately.
Step 5: Add Wave Details and Tropical Texture
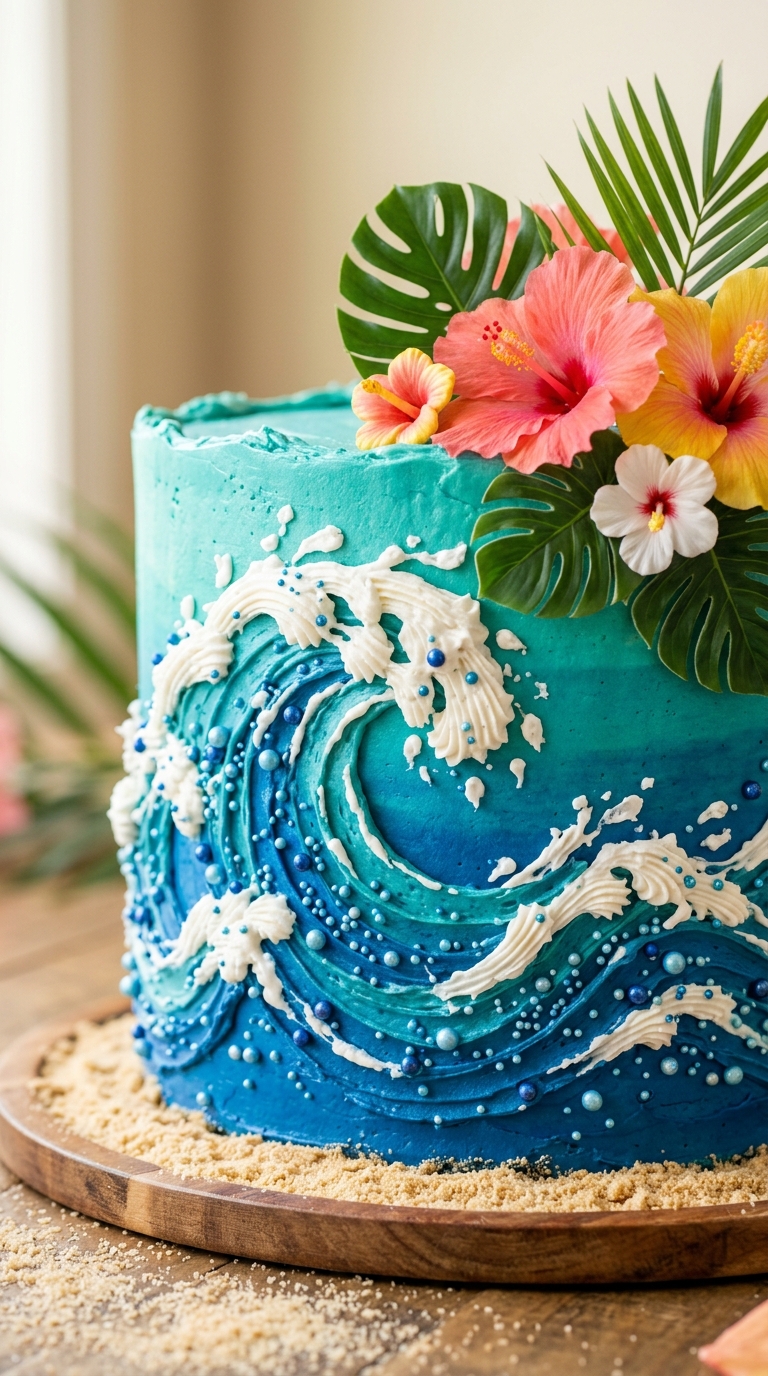
Load the reserved white buttercream into a piping bag fitted with a small star tip or leaf tip. Pipe small wave shapes around the lower and middle portions of the cake sides — short, sweeping curves that suggest cresting waves. Drag the tip of each piped wave gently sideways with a toothpick after piping to create the tapered, breaking wave appearance. This detail takes under ten minutes and adds tremendous visual authenticity to the ocean theme.
Add toasted coconut flakes around the very base of the cake — press them gently into the buttercream in a band around the bottom edge. These represent the sandy Hawaiian beach at the waterline and add a natural, textural element that grounds the cake visually and adds a subtle coconut aroma that complements the tropical cake layers underneath.
Scatter edible blue and teal pearl sprinkles across the ocean sections of the cake exterior using a dry spoon or your fingertips. Press them very gently into the buttercream so they adhere without sinking below the surface. Add edible glitter in blue and teal over the wave sections using a dry pastry brush in light sweeping motions for a shimmering ocean effect that catches light from every angle.
Step 6: Add Hibiscus Flowers and Palm Leaf Details
Tropical Stitch cake decoration ideas always include Hawaiian flora — specifically hibiscus flowers and palm leaves, which are synonymous with Hawaii’s visual identity and appear throughout the Lilo and Stitch film. Add tropical sugar flowers purchased from a cake decorating supplier, or make simple ones from fondant by rolling small pieces thin and cutting petal shapes with a knife or cutter.
Press two to three hibiscus or plumeria sugar flowers around the cake — one at the base, one mid-side, and one positioned near where the Stitch topper will sit on the top. This placement creates a diagonal visual flow across the cake that draws the eye from base to top in a natural, balanced arc. Roll small pieces of green fondant into leaf shapes and press them behind each flower arrangement.
If you want to add palm leaves using buttercream instead of fondant, use a leaf piping tip and green-tinted buttercream. Hold the piping tip flat against the cake surface and apply steady pressure while pulling away — this creates a natural-looking leaf shape in one motion. Practice this motion twice on a plate before attempting it on the actual cake — it takes one or two tries to get the right pressure and angle.
Step 7: Add Stitch to the Cake
This is the moment that transforms a beautiful tropical cake into a Disney Stitch birthday cake ideas creation that a child will remember for years. There are three approaches depending on your skill level and available time:
Approach one — Figurine topper (easiest): Purchase a Stitch toy figurine, wash it thoroughly in warm soapy water, dry completely, and press it into the top surface of the cake. Surround the base of the figurine with a small cluster of tropical flowers and coconut flakes. Takes two minutes and looks adorable. This is the approach I always recommend for first-time character cakes — the result looks intentional and the child cares far more about Stitch being there than whether he was sculpted from fondant.
Approach two — Printed wafer paper topper (intermediate): Print a high-quality Stitch image from a licensed coloring page or character image onto edible wafer paper at a local cake supply shop or print-at-home edible printer. Cut the image out carefully and attach it to a bamboo skewer using a small piece of wafer paper folded over the top of the skewer as adhesive. Insert into the top of the cake surrounded by tropical decoration. Flat but very effective and recognizable.
Approach three — Fondant Stitch features (advanced): Use blue fondant tinted with the same cerulean-plus-purple gel color combination used in the buttercream to create basic Stitch features. Roll a large round ball for the head, two large pointed oval ears, a smaller round for the nose, and small oval paws. Use black fondant for the nose tip and eye outlines. This Lilo and Stitch fondant cake ideas approach produces the most impressive results but requires confidence with fondant and at least an extra hour.
Step 8: Final Decorations and Presentation
Add any remaining decoration elements to complete the overall composition. Press additional tropical flowers around the base of the Stitch topper on the top surface. Add a few scattered blue edible pearls across the top for the ocean surface effect. Dust the very top surface lightly with edible blue glitter for a shimmering Hawaiian sunset effect that photographs beautifully under any lighting.
Step back frequently during this final stage and evaluate the overall balance before adding more elements. IMO, the best-looking kids Lilo and Stitch cake birthday designs feel abundant and tropical without feeling cluttered — every element should have visual space around it rather than competing for the same area. A few well-placed flowers, one confident Stitch placement, and a clean ocean gradient is more impressive than a cake covered in every possible decoration 🙂
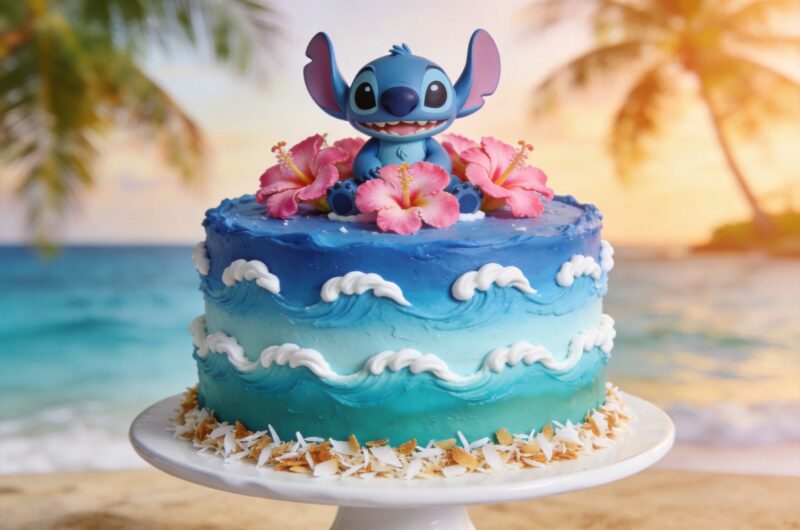
Tropical Lilo and Stitch Cake With Coconut Layers
16
servings45
minutes30
minutesThis Lilo and Stitch Cake bakes tropical coconut vanilla layers, frosts them with an ocean-gradient buttercream in blue, teal, and turquoise, adds piped wave details, tropical flowers, and a Stitch topper. Serving 12 to 16 people, it delivers a stunning Hawaiian themed birthday cake for any Disney fan.
Ingredients
Tropical Vanilla Cake Layers:
3 cups all-purpose flour, sifted
1 tablespoon baking powder
1/2 teaspoon baking soda
1 teaspoon salt
225g unsalted butter, room temperature
2 cups granulated white sugar
4 large eggs, room temperature
1 cup full-fat canned coconut milk
1/3 cup whole milk, room temperature
1/4 cup vegetable oil
2 teaspoons vanilla extract
1 teaspoon coconut extract
Vanilla Buttercream:
450g unsalted butter, room temperature
6 cups powdered sugar, sifted
5 to 6 tablespoons heavy cream
2 teaspoons vanilla extract
1/4 teaspoon salt
Color and Decoration:
Gel food coloring in cerulean blue, purple, teal, turquoise, and white
Stitch figurine or printed wafer paper topper
Tropical sugar flowers (hibiscus or plumeria)
Green fondant for palm leaves
Edible blue and teal pearl sprinkles
Toasted coconut flakes
Edible blue and teal glitter (optional)
- Preheat oven to 175 degrees Celsius and prepare two 20cm round cake pans with butter, parchment circles, and a light flour dusting on the greased sides
- Sift flour, baking powder, baking soda, and salt together, then combine canned coconut milk, whole milk, vanilla, and coconut extract in a separate jug
- Beat room-temperature butter and oil on medium for two minutes, add sugar and beat four minutes until pale and fluffy, scraping the bowl twice
- Add eggs one at a time beating 30 seconds after each, then add dry ingredients and coconut milk mixture in three alternating additions on the lowest speed just until each disappears
- Divide evenly between prepared pans, level, tap three times each, and bake at 175 degrees Celsius for 28 to 33 minutes until a toothpick comes out with just a few moist crumbs
- Cool in pans fifteen minutes, invert onto racks, peel parchment, and cool completely before decorating
- Beat 450g room-temperature butter for five minutes until pale, add powdered sugar in additions, then vanilla, salt, and cream, beat three more minutes until fluffy
- Reserve one cup of plain white buttercream before coloring the rest into cerulean blue, teal, and turquoise using gel food coloring — mixing cerulean and a tiny amount of purple for Stitch’s specific blue shade
- Level both layers, stack with white buttercream filling, apply a thin crumb coat over the exterior, and refrigerate for 20 to 30 minutes until completely firm
- Apply the teal, turquoise, and Stitch blue buttercreams in organic overlapping sections around the chilled cake, then smooth with a bench scraper in one to two clean rotations
- Pipe white buttercream wave shapes around the sides and drag the tips sideways with a toothpick to create a breaking wave effect
- Press toasted coconut flakes around the base, scatter edible pearl sprinkles and glitter across the ocean sections, then add tropical sugar flowers and green palm leaf details at multiple points
- Place the Stitch figurine or topper on the top of the cake surrounded by a cluster of tropical flowers, then photograph immediately and serve at room temperature
Decoration Approaches by Skill Level
Complete Beginner
Use white and blue buttercream in simple horizontal sections — blue at the base, teal in the middle, white at the top. Place a Stitch figurine on top. Press a ring of tropical sugar flowers purchased from a craft store around the base. Add blue pearl sprinkles. This approach takes under 30 minutes of decoration time and produces a recognizably themed, cheerful result.
Intermediate Baker
Execute the full ocean gradient buttercream with piped wave details, pressed coconut flakes at the base, tropical sugar flowers at multiple points, and a printed wafer paper Stitch topper. This level of decoration takes one to two hours and produces a genuinely impressive result that photographs beautifully and requires no fondant skills whatsoever.
Confident Home Baker
Execute the full ocean gradient, wave details, tropical flowers from fondant, and a basic fondant Stitch head and ears as the topper. This Stitch cake design easy approach produces results that genuinely resemble professional bakery cakes and makes the celebration significantly more memorable for the child receiving it.
Frequently Asked Questions
Q1: Where can I buy a Stitch figurine for the cake topper? Stitch figurines work perfectly as cake toppers and are widely available from toy stores, Disney merchandise retailers, and online marketplaces like Amazon. Look for a solid plastic figurine rather than a plush — plastic can be washed thoroughly and stands upright securely when pressed into buttercream. Always wash and dry the figurine completely before using it on food. Alternatively, Stitch character cake toppers made from food-safe cardstock or wafer paper are available from specialist cake decoration suppliers online.
Q2: How do I get the exact Stitch blue color in buttercream? Stitch’s fur is a warm, slightly purple-tinted blue — not a cold primary blue. Start with cerulean blue gel food coloring and add a tiny amount of purple or violet gel coloring — literally one toothpick dip of purple per tablespoon of blue — until you achieve a warm blue with a slight violet undertone. Always let colored buttercream rest for fifteen minutes after coloring because the color deepens significantly as the gel pigment fully distributes through the fat.
Q3: Can I use a box mix instead of baking from scratch for this cake? Yes — use a white or vanilla box mix and add one teaspoon of coconut extract plus replace the water in the box instructions with equal amounts of canned full-fat coconut milk. This simple upgrade makes the box mix taste significantly more tropical and coconutty while still being easy to prepare. The decoration process, timeline, and buttercream recipe remain completely identical regardless of whether you use a scratch or box mix base.
Make This Cake and Watch the Birthday Magic Happen
This Lilo and Stitch cake ideas birthday guide gives you everything you need to create a genuinely impressive character cake at home regardless of your starting skill level. The tropical coconut layers taste as good as the decoration looks. The ocean gradient buttercream is achievable on a first attempt. And Stitch on top of it all makes the whole thing unforgettable.
Make the layers ahead, execute the ocean gradient with confidence, place Stitch where he belongs, and watch a child’s face light up the moment they see it. That reaction is the only review this cake will ever need.