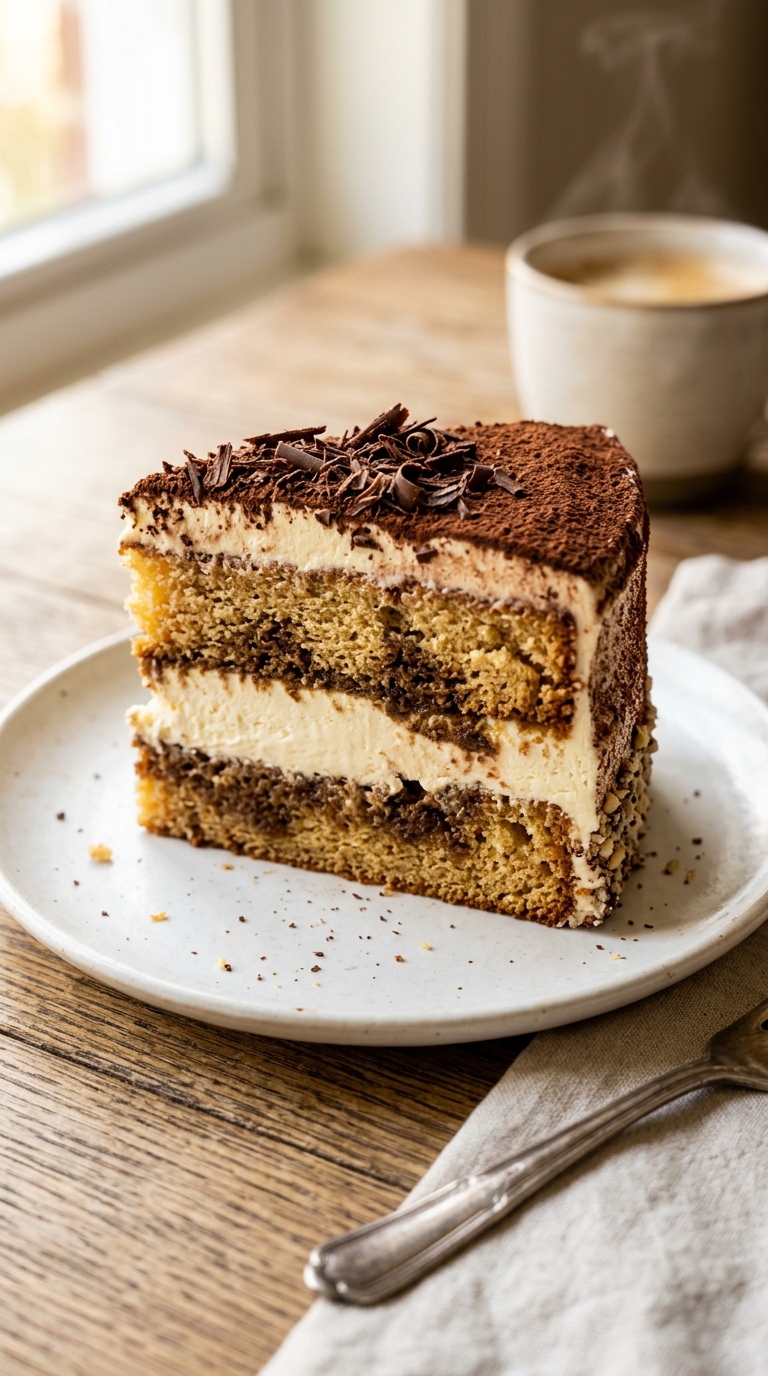
Ask any group of people what their all-time favorite dessert is and a significant number of them will say tiramisu without hesitation. There is something about the combination of espresso-soaked sponge, silky mascarpone cream, and a generous dusting of cocoa that bypasses every rational preference and goes straight for the emotional center of the brain. I made my first Tiramisu Cake recipe homemade version for a birthday dinner and it permanently replaced the traditional ladyfinger tray version in my household.
This easy Tiramisu layer cake recipe transforms the classic Italian dessert into a proper sliceable layer cake — real espresso-soaked vanilla sponge layers, authentic mascarpone cream frosting, and all the cocoa-dusted drama of the original in a format that works for birthdays, dinner parties, and genuinely any occasion that deserves something extraordinary. The best homemade Tiramisu Cake dessert you will ever eat is about to come out of your own kitchen.
Servings: 12 to 14 slices Prep Time: 30 minutes Bake Time: 28 to 33 minutes per layer Assembly and Chilling Time: 4 hours minimum (overnight preferred) Total Time: Approximately 5 to 6 hours including chilling
What You Need — The Complete Ingredients List
This creamy mascarpone Tiramisu Cake uses authentic Italian-inspired ingredients across four components. Here is everything for a two-layer 20cm round cake:
For vanilla sponge cake layers:
- 3 cups all-purpose flour, sifted
- 1 tablespoon baking powder
- 1/2 teaspoon salt
- 225g unsalted butter, room temperature
- 2 cups granulated white sugar
- 4 large eggs, room temperature
- 1 cup whole milk, room temperature
- 1/4 cup vegetable oil
- 2 teaspoons pure vanilla extract
Espresso soak:
- 1 cup freshly brewed strong espresso or very strong coffee, cooled to room temperature
- 2 tablespoons coffee liqueur such as Kahlua or Tia Maria (optional but deeply authentic)
- 1 tablespoon granulated sugar (dissolve into the hot espresso before cooling)
For the mascarpone cream frosting:
- 500g full-fat mascarpone cheese, room temperature
- 350ml heavy whipping cream, very cold
- 1 cup powdered sugar, sifted
- 2 teaspoons pure vanilla extract
- 1/4 teaspoon salt
- 2 tablespoons coffee liqueur (optional — intensifies the tiramisu flavor throughout the frosting)
For the cocoa decoration:
- 3 to 4 tablespoons high-quality Dutch-process cocoa powder (for dusting)
- Dark chocolate shavings or curls (optional but visually stunning)
- Espresso beans for garnish (whole, for placement on top)
- Cocoa stencil for decorative pattern (optional)
FYI, full-fat mascarpone is genuinely non-negotiable here. Low-fat mascarpone has a higher water content that prevents the frosting from whipping to a stable, pipeable consistency. It deflates, weeps liquid, and produces a runny, unspreadable mess that ruins everything. Full-fat mascarpone from the refrigerated dairy section — not a shelf-stable substitute — is the only option that works reliably in this classic Italian Tiramisu Cake dessert.
The Making Process — Every Step in Full Detail
Step 1: Brew the Espresso Soak First
Start with the espresso soak before you do anything else — it needs time to cool completely to room temperature before touching the cake layers. Brew one cup of very strong espresso using your espresso machine, Moka pot, AeroPress, or French press with a double concentration of coffee grounds. The coffee must be genuinely strong — weak coffee produces a pale, flat soak that disappears into the sponge without delivering any real coffee flavor in the finished cake.
Add one tablespoon of granulated sugar to the hot espresso and stir until fully dissolved. The dissolved sugar prevents the coffee soak from tasting harsh or overly bitter against the sweet sponge layers. Add the coffee liqueur if using — Kahlua is the most common choice and adds a rich, slightly sweet coffee depth that plain espresso alone does not have. Let the mixture cool completely at room temperature or accelerate the cooling in the refrigerator for thirty minutes while you prepare the batter.
The espresso soak is what makes this a genuine coffee Tiramisu Cake recipe easy version that tastes authentically Italian rather than just a vanilla cake with cocoa on top. Do not underestimate this component — it is the single element that most distinguishes an extraordinary tiramisu cake from a mediocre one.
Step 2: Bake the Vanilla Sponge Layers
Preheat your oven to 175 degrees Celsius. Grease two 20cm round cake pans, line the bottoms with parchment paper circles, grease the parchment, and lightly flour the sides. This complete three-step preparation creates a reliable release for both layers — particularly important when you need intact layers that can absorb the espresso soak without tearing at the edges during handling.
Sift flour, baking powder, and salt together into a medium bowl and set aside. In a separate bowl or jug, combine room-temperature whole milk, vegetable oil, and vanilla extract and stir together. Beat room-temperature butter in a stand mixer on medium speed for two full minutes until pale and smooth. Add granulated sugar and beat on medium-high for four minutes until the mixture looks very pale, almost white, and genuinely airy — scraping the bowl at the two-minute mark.
Add the four room-temperature eggs one at a time, beating for 30 seconds after each addition on medium speed. The extended creaming and gradual egg addition build the aerated structure that creates a tender, slightly porous sponge — the porosity is actually an advantage in a tiramisu cake because it allows the espresso soak to penetrate deeply and evenly into every layer rather than sitting only on the surface.
Add the sifted dry ingredients and milk mixture in three alternating additions on the lowest speed — beginning and ending with dry ingredients. Mix just until each addition disappears with no visible white streaks remaining. Do not overmix after the flour goes in — overdeveloped gluten creates a dense, tight crumb that resists absorbing the espresso soak rather than welcoming it. Divide the batter evenly between the two prepared pans, level the surfaces, and tap each three times on the counter.
Step 3: Make the Mascarpone Cream Frosting
This mascarpone cream is the heart of the sponge Tiramisu Cake step by step method — it needs to be made correctly to achieve the right consistency for both spreading between layers and piping on the exterior. Start by placing the 500g of room-temperature mascarpone in a large mixing bowl. Beat it briefly with a hand whisk just until smooth and lump-free — do not beat it aggressively at this stage.
Pour the very cold heavy whipping cream into a chilled stand mixer bowl or a clean large bowl. Beat on medium-high speed until the cream forms medium peaks — firm enough to hold a shape but still slightly fluid at the tips. Cold cream whips significantly better and more stably than cream at room temperature, which is why the cream must come directly from the refrigerator immediately before whipping. The bowl and beaters can also be chilled in the freezer for ten minutes before whipping for the most stable result.
Add the sifted powdered sugar, vanilla extract, salt, and coffee liqueur if using to the whipped cream. Fold them in gently with a rubber spatula using four to five deliberate strokes — just enough to incorporate without deflating the aerated cream significantly. Now add the smooth mascarpone to the whipped cream mixture and fold together gently until unified and smooth.
The folding technique here is critical. Do not switch back to the electric mixer after adding the mascarpone — the mechanical action over-beats the mascarpone and causes it to release its fat, which turns the mixture grainy and eventually liquid. Hand folding preserves the light, mousse-like texture that makes this frosting so extraordinary in the finished creamy mascarpone Tiramisu Cake. Refrigerate the finished mascarpone cream for 20 minutes before using — it firms up slightly and becomes much easier to spread and pipe cleanly.
Step 4: Apply the Espresso Soak to the Cake Layers
Level both completely cooled cake layers with a long serrated knife if they domed during baking. Place a small dab of mascarpone cream on your cake board to prevent sliding. Position the first layer flat-side down on the board. Use a pastry brush to apply half the espresso soak evenly across the entire top surface of the first layer — brush it on in deliberate, overlapping strokes from the center outward, covering every area including the edges.
Apply the soak moderately generously — you want the top surface to look visibly damp and slightly darker in color, but not saturated to the point where the cake becomes fragile and falls apart when handled. Under-soaking produces a cake that tastes like vanilla sponge with cocoa on top rather than a genuine classic Italian Tiramisu Cake dessert. Over-soaking produces layers that collapse under the weight of the frosting and filling during assembly and slicing :/
Let the soaked first layer sit for two to three minutes so the espresso absorbs from the surface into the interior of the sponge before adding any cream. This brief absorption time prevents the soak from mixing into the mascarpone cream layer when you spread it on top, which would dilute the cream and create a wet, unstable filling. Have you ever sliced a tiramisu cake and watched the layers slide apart? Insufficient absorption time before filling is almost always the reason.
Step 5: Fill and Stack the Layers
Add a generous filling layer of the chilled mascarpone cream — approximately 200g or roughly half a centimeter thick — over the soaked first layer. Spread it evenly to the edges using an offset spatula. The filling layer should be level, smooth, and complete — reaching all the way to the outer edge without falling short and leaving the edges dry when cut.
Place the second cake layer flat-side up on top of the filled first layer. Press it down gently and evenly across the entire surface to ensure full contact with the cream filling underneath. Check that the stacked cake looks level from all angles — adjust by pressing gently on any higher side before the layers set into position. Apply the remaining espresso soak to the top surface of the second layer using the same deliberate brush technique as the first layer.
Let the fully soaked stacked cake sit at room temperature for three to four minutes so the top layer absorbs the espresso fully before any outer frosting goes on. Placing cold mascarpone cream on a freshly soaked surface causes the cream to slide before it can adhere — the brief absorption wait time prevents this entirely. Refrigerate the assembled, soaked, unfrosted stack for twenty minutes while the mascarpone cream firms up.
Step 6: Apply the Mascarpone Crumb Coat and Final Layer
Apply a thin, even layer of mascarpone cream over the entire exterior of the stacked cake — top and all sides. This crumb coat seals any loose crumbs from the cut and soaked cake surfaces against the exterior so they do not appear in the final layer of frosting. Mascarpone cream picks up coffee-stained crumbs more visibly than regular buttercream because of its pale color — the crumb coat is genuinely essential for a clean, white exterior finish.
Refrigerate the crumb-coated cake for another twenty to thirty minutes until the mascarpone cream feels firm and set on the outside. Then apply the final, thicker outer layer of mascarpone cream using an offset spatula for the sides and top. Use a bench scraper held vertically against the side of the cake and rotated slowly to achieve a smooth, even finish. The mascarpone cream is more delicate than buttercream and tears more easily — use gentle, confident strokes rather than aggressive back-and-forth scraping motions.
For a more textured, rustic finish — which IMO suits a tiramisu cake beautifully and requires less technical precision than a mirror-smooth surface — use the back of a spoon to create soft, organic swirls across the sides and top after applying the final cream layer. This textured approach looks intentional, elegant, and hides any minor imperfections in the cream application completely.
Step 7: Pipe the Decorative Border
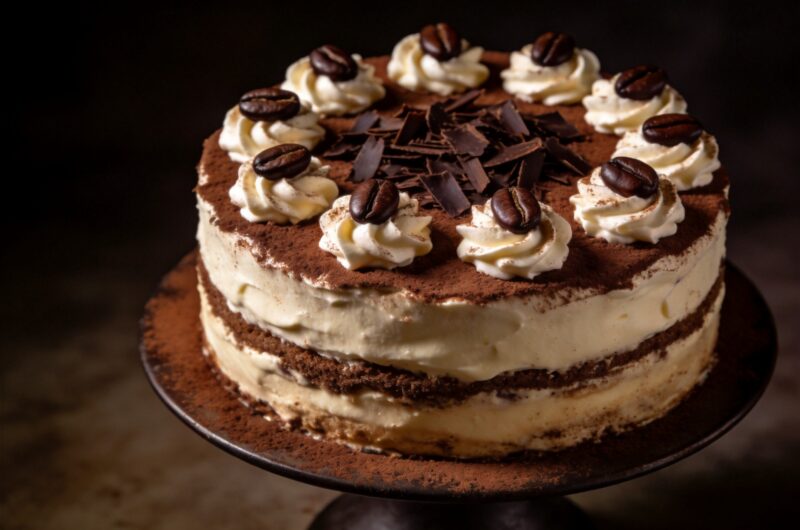
Load the remaining mascarpone cream into a piping bag fitted with a large open star tip. Pipe a border of tall, generous rosettes or swirled shells around the top edge of the cake — this elevated border creates the beautiful crown effect that makes this simple Tiramisu birthday cake recipe look genuinely professional and celebratory. Pipe each rosette by applying steady pressure and releasing before pulling up — a clean release at the top of each rosette creates a defined, attractive shape.
If the mascarpone cream feels too soft to hold a defined piped shape, refrigerate the piping bag for five to ten minutes before piping. Soft mascarpone cream loses its piped shape immediately and the rosettes collapse into flat blobs — refrigerating firms the cream enough to hold a clean, defined shape for several hours after piping. Always test the consistency on a plate before piping on the actual cake. Two or three test rosettes tell you immediately whether the cream needs more chilling or is ready to use.
Step 8: Dust with Cocoa and Add Final Decorations
Spoon two tablespoons of Dutch-process cocoa powder into a fine mesh sieve. Hold the sieve about ten to fifteen centimeters above the top surface of the cake and tap it gently — a controlled, even shower of cocoa settles across the mascarpone surface and piped rosettes. Dutch-process cocoa produces a deeper, more chocolatey, less harsh cocoa flavor than natural cocoa powder and its slightly reddish-brown color creates a more visually dramatic finish. This is the final touch that transforms a beautifully frosted cake into a visually unmistakable coffee Tiramisu Cake recipe easy creation.
Carefully dust the sides of the cake with a light coating of cocoa as well — hold the sieve close to the sides and tap very gently for a lighter application than the top. Add dark chocolate shavings or curls across the top between the piped rosettes — use a vegetable peeler drawn along the side of a slightly warm chocolate bar to create curls easily. Place whole espresso beans on top of each piped rosette for the classic tiramisu garnish that looks elegant and immediately communicates the coffee flavor to anyone looking at the cake.
Refrigerate the fully decorated cake for a minimum of four hours before serving — overnight is significantly better. The mascarpone cream sets more firmly during extended refrigeration, the espresso soak distributes more completely through the sponge layers, and the overall flavor deepens and integrates into something far more cohesive than a freshly assembled cake. Bring the cake to room temperature for twenty minutes before slicing and serving.
The No-Bake Version — Same Flavor, Different Structure
A no bake Tiramisu Cake recipe produces a genuinely impressive result without any oven involvement. Line a 20cm springform pan with plastic wrap. Briefly dip ladyfinger biscuits — one at a time, for just one second per side — into the cooled espresso soak and arrange them in a tight layer across the base of the pan.
Spread half the mascarpone cream over the ladyfinger layer in an even coat. Add a second layer of dipped ladyfingers on top, then spread the remaining mascarpone cream over everything. Dust generously with cocoa powder, cover with plastic wrap, and refrigerate overnight. The ladyfingers absorb the espresso fully during the long refrigeration and soften into a cake-like texture. Unmold using the plastic wrap overhang and serve directly — the no-bake version has a different but equally wonderful texture compared to the baked layer cake version.
Variations Worth Trying
Chocolate Tiramisu Cake Version
Replace half a cup of the all-purpose flour in the cake layers with high-quality Dutch-process cocoa powder and add a quarter teaspoon of baking soda to the dry ingredients. This produces chocolate sponge layers that taste extraordinary with the espresso soak and mascarpone cream — creating a chocolate Tiramisu Cake recipe ideas variation that is genuinely exceptional and popular for birthdays where regular Tiramisu feels too understated. The chocolate sponge absorbs the espresso soak differently than vanilla — slightly less deeply — so apply the soak more generously than the standard version.
Amaretto Tiramisu Cake Version
Replace the coffee liqueur in both the espresso soak and the mascarpone cream with amaretto almond liqueur. Amaretto adds a sweet, marzipan-adjacent warmth that pairs beautifully with the bitter espresso and the rich mascarpone cream. Add a handful of toasted flaked almonds between the layers and scattered across the top before the cocoa dusting. This variation produces a slightly different flavor direction — softer and more nut-forward — that many people prefer to the standard coffee liqueur version.
Common Mistakes That Ruin Tiramisu Cake
Avoid these for a perfect result:
- Using low-fat mascarpone: It weeps liquid and produces runny, unspreadable frosting — always use full-fat from the refrigerated section
- Over-soaking the layers: Saturated layers collapse during assembly and slicing — aim for damp and darker colored, not soggy
- Beating the mascarpone with an electric mixer: Causes it to release fat and become grainy — always fold mascarpone into whipped cream by hand
- Skipping the chilling time: Freshly assembled cake tastes flat — overnight refrigeration is where the flavors genuinely come together
- Using pre-ground or instant coffee for the soak: Produces a flat, harsh soak — always use freshly brewed strong espresso or cold brew concentrate
- Dusting cocoa too early before refrigerating: The cocoa absorbs moisture from the cream and turns dark and wet-looking — always dust as the final step right before serving or shortly before
Tiramisu Cake With Mascarpone Frosting Recipe
14
servings30
minutes33
minutesThis Tiramisu Cake soaks vanilla sponge layers in espresso and coffee liqueur, fills and frosts them with silky mascarpone whipped cream, and finishes with a generous cocoa dusting and espresso bean garnish. Serving 12 to 14 people, it delivers authentic Italian tiramisu flavor in an elegant sliceable layer cake.
Ingredients
Vanilla Sponge Layers:
3 cups all-purpose flour, sifted
1 tablespoon baking powder
1/2 teaspoon salt
225g unsalted butter, room temperature
2 cups granulated white sugar
4 large eggs, room temperature
1 cup whole milk, room temperature
1/4 cup vegetable oil
2 teaspoons vanilla extract
Espresso Soak:
1 cup strong brewed espresso, cooled
2 tablespoons coffee liqueur (optional)
1 tablespoon granulated sugar
Mascarpone Cream Frosting:
500g full-fat mascarpone, room temperature
350ml heavy whipping cream, very cold
1 cup powdered sugar, sifted
2 teaspoons vanilla extract
1/4 teaspoon salt
2 tablespoons coffee liqueur (optional)
Decoration:
3 to 4 tablespoons Dutch-process cocoa powder
Dark chocolate shavings or curls
Whole espresso beans for garnish
- Brew one cup of very strong espresso, dissolve one tablespoon of sugar into it while hot, add coffee liqueur if using, and cool completely to room temperature before any use
- Preheat oven to 175 degrees Celsius and prepare two 20cm round cake pans with butter, parchment circles, and a light flour dusting
- Sift flour, baking powder, and salt together, then combine whole milk, oil, and vanilla in a separate jug
- Beat room-temperature butter for two minutes, add sugar and beat four minutes until pale and airy, then add eggs one at a time beating 30 seconds after each
- Add dry ingredients and milk mixture in three alternating additions on the lowest speed, mixing just until each disappears, then divide evenly between pans and bake at 175 degrees Celsius for 28 to 33 minutes
- Cool in pans fifteen minutes, invert onto racks, peel parchment, and cool completely before any soaking or assembly
- Whip very cold heavy cream to medium peaks, fold in powdered sugar, vanilla, salt, and optional coffee liqueur gently, then fold in room-temperature mascarpone by hand until smooth and unified
- Refrigerate the finished mascarpone cream for twenty minutes until slightly firmed
- Level both cooled layers, place the first on the cake board, and brush half the espresso soak evenly across the entire surface using a pastry brush in overlapping strokes
- Let the soak absorb for two to three minutes, then spread a generous layer of mascarpone cream over the soaked surface
- Place the second layer flat-side up on top, brush the remaining espresso soak across the entire surface, and let absorb for two to three minutes before refrigerating the stacked layers for twenty minutes
- Apply a thin crumb coat of mascarpone cream over the entire exterior and refrigerate twenty to thirty minutes until firm
- Apply the final outer layer of mascarpone cream, smooth the sides with a bench scraper and the top with an offset spatula, then pipe rosettes around the top edge using a large open star tip
- Sift Dutch-process cocoa powder through a fine mesh sieve evenly over the top and sides, add chocolate shavings and espresso beans, then refrigerate for a minimum of four hours or overnight before serving
Frequently Asked Questions
Q1: Can I make Tiramisu Cake without alcohol for children or non-drinkers? Yes — the coffee liqueur in both the espresso soak and the mascarpone cream is completely optional. Replace it with an equal amount of strong brewed espresso in the soak and a teaspoon of vanilla extract in the cream. The finished cake tastes genuinely excellent without the liqueur — the coffee soak and mascarpone cream carry the full tiramisu flavor profile independently without any alcohol required.
Q2: Why does my mascarpone cream look grainy and separated? Grainy, separated mascarpone cream happens from one of three causes — using cold mascarpone straight from the refrigerator rather than room-temperature, beating the mascarpone with an electric mixer at high speed after adding it to the whipped cream, or using low-fat mascarpone that has insufficient fat content to remain stable. Always use room-temperature full-fat mascarpone, always add it to whipped cream by hand folding, and never return to the electric mixer after the mascarpone joins the cream.
Q3: How long does Tiramisu Cake keep in the refrigerator? The assembled, decorated Tiramisu Cake keeps refrigerated for up to four days. The mascarpone cream remains stable and the cocoa dusting stays fresh during this time when stored covered — place a large inverted bowl or use a cake dome rather than plastic wrap directly against the cocoa surface, which would smear it. The cake actually tastes better on day two and three than on the day of assembly as the flavors continue to develop and deepen throughout refrigeration.
Make This Cake and Earn the Best Compliment in Baking
This Tiramisu Cake recipe homemade gives you a genuinely extraordinary dessert that combines the best elements of the classic Italian original with the visual impact and serving practicality of a proper layer cake. The espresso-soaked vanilla sponge, the silky mascarpone cream, and the cocoa-dusted finish produce something that tastes as elegant as it looks.
Make it the day before, refrigerate overnight, dust the cocoa as the last step before serving, and watch the reaction when you carry it to the table. That moment of recognition — when everyone realizes what it is and what it is going to taste like — is the most rewarding thing a home baker can experience.