I made this s’mores layer cake recipe for a birthday party last autumn and genuinely watched grown adults lose all composure when the toasted marshmallow frosting came out scorched and golden from the kitchen torch. The combination of chocolate, graham cracker, and toasted marshmallow in a proper layer cake format is ridiculous in the best possible way — and it tastes exactly as good as it looks.
This easy s’mores cake homemade version takes everything that makes s’mores brilliant — the chocolate richness, the honeyed crunch of graham crackers, and the sweet, slightly smoky caramelisation of marshmallow — and builds them into a structured, impressive cake that you can serve at a celebration without needing a bonfire. The technique involves three distinct components that all come together in the final assembly, and once you understand how each part works, the whole process feels completely manageable.
What You’ll Need (Ingredients)
Three component groups make this cake. Each one earns its place in the final result.
For chocolate cake layers:
- 250g (2 cups) plain flour
- 80g (3/4 cup) unsweetened cocoa powder — Dutch-processed for deepest colour
- 300g (1.5 cups) caster sugar
- 2 teaspoons baking powder
- 1 teaspoon bicarbonate of soda
- 1/2 teaspoon salt
- 3 large eggs, room temperature
- 240ml (1 cup) buttermilk, room temperature
- 120ml (1/2 cup) vegetable oil
- 240ml (1 cup) hot strong brewed coffee
- 2 teaspoons vanilla extract
Graham cracker layer and crumble:
- 200g (about 14 to 15) digestive biscuits or graham crackers, finely crushed
- 60g (4 tablespoons) unsalted butter, melted
- 2 tablespoons caster sugar
- 1/4 teaspoon cinnamon
For the chocolate ganache filling:
- 200g (7 oz) dark chocolate, finely chopped
- 180ml (3/4 cup) heavy cream
- 1 tablespoon unsalted butter
Toasted marshmallow frosting:
- 4 large egg whites
- 250g (1.25 cups) caster sugar
- 1/4 teaspoon cream of tartar
- 1 teaspoon vanilla extract
- A pinch of salt
For decoration:
- Extra graham crackers or digestive biscuits, broken into pieces
- Mini marshmallows for scattering
- Chocolate shards or a drizzle of extra ganache
How to Make It — Full Step-by-Step Process
Step One: Make the Graham Cracker Layer First
The graham cracker layer needs time to set before assembly, so make it first before touching anything else. Place 200g of digestive biscuits or graham crackers into a food processor and pulse until finely crushed to a sandy texture. Alternatively, place them in a sealed zip-lock bag and crush with a rolling pin — this takes slightly longer but produces the same result.
Transfer the crushed biscuits to a bowl and add 2 tablespoons of caster sugar and 1/4 teaspoon of cinnamon. Pour in 60g of melted butter and mix with a fork until every crumb is evenly coated and the mixture holds together when pressed between your fingers. It should look and feel like wet sand — not dusty and not soaked.
Line a flat baking tray or the base of one of your cake tins with parchment. Press approximately two-thirds of the graham cracker mixture firmly and evenly across a 20cm circle to create a flat, compact disc. Use the back of a spoon or a flat-bottomed glass to press it firmly — the more compact this layer, the cleaner it slices later. Place in the freezer for at least 30 minutes to firm completely. Reserve the remaining one-third of the cracker mixture for the decoration and topping later. FYI, the frozen disc is what creates the satisfying crunch layer inside the finished cake that makes every bite texturally interesting.
Step Two: Preheat Oven and Prepare the Cake Tins
Set your oven to 175°C (350°F) fan-forced or 180°C (360°F) conventional. Allow a full 20 minutes of preheating before the tins go in. Grease two 20cm (8 inch) round cake tins thoroughly, line the bases with baking parchment circles, and grease the parchment as well. The double-grease approach prevents the chocolate batter from sticking to any surface during the release — particularly important because the chocolate cake layers in this indulgent s’mores cake recipe from scratch are quite moist and tender, which makes them slightly more delicate to unmould than a standard dry-crumbed sponge.
Step Three: Mix the Dry Ingredients
Sift 250g of plain flour, 80g of cocoa powder, 2 teaspoons of baking powder, 1 teaspoon of bicarbonate of soda, and 1/2 teaspoon of salt into a large mixing bowl. Add 300g of caster sugar and whisk all the dry ingredients together briefly for 20 seconds. This even distribution of raising agents through the flour prevents uneven rising and eliminates the risk of concentrated pockets of bicarbonate of soda that can leave a faint metallic taste in the finished cake.
Step Four: Mix the Wet Ingredients
In a separate large jug, whisk together 3 room temperature eggs, 240ml of buttermilk, 120ml of vegetable oil, and 2 teaspoons of vanilla extract. Whisk for about 30 seconds until the mixture looks uniform and slightly pale. The buttermilk adds acidity that tenderises the gluten in the flour and reacts with the bicarbonate of soda to produce additional lift and a more open, tender crumb structure. This is what makes the graham cracker chocolate cake layers in this recipe taste soft and moist rather than dense and dry against the crunchy biscuit layer.
Step Five: Combine and Add Hot Coffee
Pour the wet mixture into the dry ingredients bowl and fold together with a large spatula until just combined with no dry flour streaks visible. Stop folding at this point — over-mixing toughens the crumb. Pour 240ml of hot strong brewed coffee slowly into the batter while folding very gently. The batter will thin considerably after the coffee addition — this is correct and expected.
Hot coffee blooms the cocoa powder completely and produces a deeply developed chocolate flavour that a cooler liquid cannot replicate. The caffeine evaporates during baking and leaves only the flavour contribution, so the finished cake does not taste of coffee — it tastes of deep, rich, complex chocolate that has a subtle darkness beneath the sweetness. Divide the finished batter evenly between both prepared tins and tap each tin on the counter 3 to 4 times before baking.
Step Six: Bake the Chocolate Layers
Place both tins on the centre rack with space between them and bake for 30 to 35 minutes. Do not open the oven door during the first 25 minutes. At 30 minutes, test with a skewer inserted into the centre of each layer — moist crumbs mean the cake is done, wet batter means another 3 to 4 minutes. Cool in the tins for 15 minutes, then invert onto a wire rack and cool completely — a minimum of 45 minutes — before beginning assembly.
Step Seven: Make the Chocolate Ganache
While the cake layers cool, make the ganache filling. Place 200g of finely chopped dark chocolate into a heatproof bowl. Heat 180ml of heavy cream in a small saucepan over medium heat until it just begins to simmer — small bubbles forming around the edges, steam rising from the surface. Do not allow it to boil fully.
Pour the hot cream over the chopped chocolate immediately. Leave undisturbed for 60 seconds to allow the heat of the cream to melt the chocolate without stirring. After 60 seconds, stir gently from the centre outward in slow circular motions until the mixture looks completely smooth, glossy, and uniform. Add 1 tablespoon of butter and stir until melted and fully incorporated — the butter adds a silk-like gloss and a slightly richer flavour to the finished ganache.
Allow the ganache to cool at room temperature for 45 to 60 minutes until it thickens to a spreadable, fudgy consistency that holds its shape when you scoop it with a spoon. If it feels too runny after 60 minutes, refrigerate for 15 minutes and check again. If it sets too firmly, warm it briefly over a bowl of hot water and stir gently.
Step Eight: Make the Swiss Meringue Marshmallow Frosting
This frosting is the showpiece of the entire cake. It mimics the texture and toastable quality of real marshmallow using a Swiss meringue base — egg whites and sugar heated together and then whipped to a glossy, billowy consistency that holds its shape and browns beautifully under a kitchen torch.
Place 4 large egg whites, 250g of caster sugar, 1/4 teaspoon of cream of tartar, and a pinch of salt into a large heatproof bowl set over a saucepan of barely simmering water. The base of the bowl must not touch the water — the steam provides indirect gentle heat. Stir the mixture continuously with a spatula or whisk for approximately 4 to 5 minutes until the sugar dissolves completely and the mixture feels warm to the touch — approximately 71°C (160°F) if you have a thermometer. Test by rubbing a small amount between your fingers — it should feel completely smooth with no sugar graininess remaining.
Remove the bowl from the heat immediately. Add 1 teaspoon of vanilla extract and begin whisking on high speed using a hand mixer or stand mixer. Whisk continuously for 6 to 8 minutes until the meringue cools to room temperature, turns bright white, and reaches stiff, glossy peaks that hold their shape clearly when you stop the mixer and lift the beaters. The finished frosting should look luxuriously thick, hold a definite peak, and feel springy rather than liquid when you run a spatula through it. This is your toasted marshmallow layer cake recipe frosting — and it needs to be used immediately while still fresh and at full volume.
Step Nine: Assemble the Layered Chocolate Marshmallow Cake
Remove the frozen graham cracker disc from the freezer and allow it to sit at room temperature for 5 minutes so it no longer feels brittle. It should still feel very firm and hold its shape perfectly when handled.
Place the first completely cooled chocolate cake layer on a flat serving plate or cake board. Spread approximately half the chocolate ganache across the top surface in an even layer, reaching almost to the edges. Carefully lift the frozen graham cracker disc and position it directly on top of the ganache layer, pressing very gently to ensure it sits flat. The ganache underneath acts as an adhesive and holds the disc in place during the remaining assembly and serving.
Spread a generous layer of the remaining ganache across the top of the graham cracker disc — this layer bonds the disc to the second chocolate cake layer that goes on top. Place the second chocolate cake layer on top of the ganache-coated disc and press very gently to seat it flat and stable.
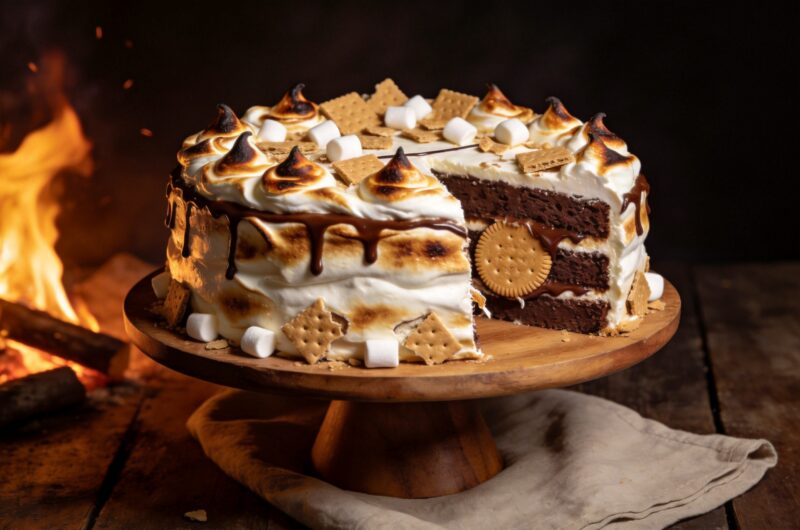
The assembled cake at this stage has three distinct visible layers in cross-section — chocolate cake, ganache, graham cracker disc, ganache, chocolate cake. This is the layered structure that produces the campfire smores cake recipe easy eating experience in every slice: the soft chocolate sponge, the rich fudgy ganache, and the sweet crunchy biscuit all in one forkful simultaneously.
Step Ten: Apply the Marshmallow Frosting
Working quickly — Swiss meringue frosting begins to deflate slightly as it sits — apply the marshmallow frosting generously to the top and sides of the assembled cake using an offset spatula. Because this frosting is much lighter and more voluminous than buttercream, apply it in a thick, generous layer rather than a thin one. The thickness is part of both the visual and flavour appeal of the gooey s’mores cake dessert homemade style presentation.
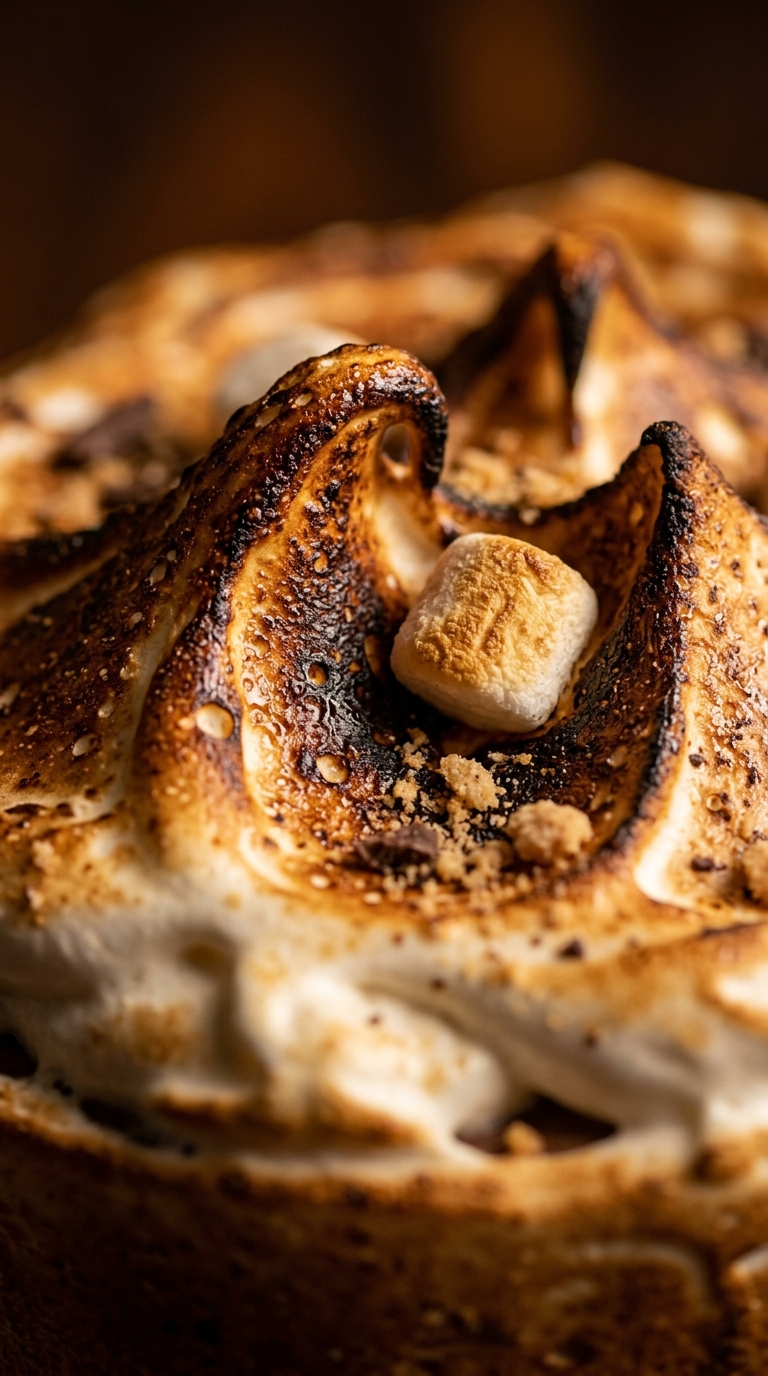
For the top, use the back of a large spoon to create dramatic swirls, peaks, and valleys across the surface. Press the spoon lightly into the frosting and pull upward sharply to create a pronounced peak. Repeat across the entire top surface in an irregular pattern — the less uniform the peaks, the more genuinely campfire-marshmallow the finished cake looks. Apply the same swirl technique to the sides, working the frosting into irregular textures that create visual depth.
Step Eleven: Toast the Marshmallow Frosting
Hold a kitchen torch 5 to 8cm above the surface of the frosting and move it in slow, steady circular motions across the peaks and high points of the meringue. The frosting will begin to colour within 2 to 3 seconds — watch carefully because the transition from golden brown to burnt happens quickly. Work in small sections, toasting one area completely before moving to the next, so you maintain control over the colour intensity across the whole surface.
The goal is a mixture of deep golden-brown on the highest peaks with paler, less toasted areas in the valleys and lower sections — exactly the uneven, natural-looking toast pattern of a real marshmallow held over a campfire. This variation in colour is what makes the toasted marshmallow layer cake recipe look so authentic and striking rather than uniformly browned.
Scatter the reserved graham cracker crumble across the top of the toasted frosting immediately after torching. Scatter a handful of mini marshmallows across the surface as well. Add broken pieces of graham cracker or digestive biscuit propped at angles into the frosting for a dramatic, textured decoration. Drizzle a thin stream of extra ganache over the entire top in a loose, random pattern. IMO, this is one of the most visually dramatic and genuinely delicious cakes you can make at home — and the kitchen torch moment is worth every second. 🙂
Why This Cake Works So Well as a Celebration Showpiece
Have you ever wondered why some cakes look impressive but taste underwhelming, while others surprise you with flavours that match or exceed how they look? The s’mores birthday layer cake ideas format works because every visual element corresponds directly to a flavour element — nothing on this cake is purely decorative.
The torched marshmallow frosting looks spectacular and tastes genuinely of toasted marshmallow. The graham cracker disc looks structural and delivers real textural contrast and biscuit flavour in every bite. The dark chocolate ganache looks like a filling and delivers genuine chocolate richness. Every component earns its presence by contributing something specific and identifiable to the eating experience.
This alignment between appearance and flavour is what separates genuinely impressive celebration cakes from ones that look beautiful but ultimately disappoint. The gooey s’mores cake dessert homemade version delivers on both dimensions simultaneously — and that is a harder thing to achieve than it might seem.
The Kitchen Torch: Worth Owning for This Recipe Alone
A kitchen torch costs very little and opens up a category of finishing techniques that no oven or grill can replicate with the same control or safety. The ability to toast only the surface of the frosting — leaving the rest of the cake cold and stable — is genuinely unique to the torch, and it is what makes this recipe’s marshmallow effect look authentic rather than oven-browned and uniform.
If you do not own a kitchen torch, place the fully frosted cake under the grill on the highest shelf with the grill set to maximum heat. Watch constantly — the grill broils the entire top surface simultaneously and the transition from golden to burnt takes about 30 seconds under direct grill heat. The result is slightly less controllable than a torch but still delivers a toasted marshmallow appearance that makes the cake look impressive.
Storing and Serving This Cake
Swiss meringue marshmallow frosting behaves differently from buttercream in storage. It stays stable at room temperature for up to 4 hours without deflating significantly. Beyond 4 hours, the frosting begins to weep slightly and the peaks lose their defined shape. For this reason, plan to serve this cake within 3 to 4 hours of assembly and torching.
If you need to prepare ahead of time, bake and cool the chocolate layers the day before and store wrapped in cling film at room temperature. Make and refrigerate the ganache the day before as well — reheat gently in a bowl of warm water until spreadable before assembly. Make the graham cracker disc the day before and keep in the freezer. Assemble, frost, and torch on the day of serving for the best appearance and texture.
Common Mistakes to Avoid
Torching too close or too fast: Holding the torch too close or moving it too quickly produces uneven, patchy browning with some areas burnt and others barely coloured. Hold the torch at least 5cm above the surface and move at a steady, deliberate pace.
Not freezing the graham cracker disc: A disc that has not firmed fully in the freezer crumbles and breaks during assembly rather than sitting as a clean, intact layer. Always freeze for the full 30 minutes minimum before using.
Using the marshmallow frosting immediately after it reaches room temperature: Swiss meringue frosting at peak stiffness spreads and holds peaks best in the first 15 to 20 minutes after reaching room temperature. Beyond this window it slowly begins to deflate. Work efficiently during the frosting stage. :/
Under-heating the egg white mixture: Insufficient heating leaves the sugar incompletely dissolved and produces a grainy frosting that feels unpleasant in the mouth. Rub a small amount between your fingers at the 4-minute mark — it must feel completely smooth before you remove it from the heat.
S’Mores Layer Cake That Beats Any Campfire Version
12
servings40
minutes33
minutesThis s’mores layer cake combines rich dark chocolate cake layers with a fudgy chocolate ganache filling, a crunchy graham cracker disc baked into the centre, and a billowy Swiss meringue marshmallow frosting toasted golden with a kitchen torch. Every element delivers genuine s’mores flavour and texture in every single slice.
Ingredients
Chocolate cake layers:
250g plain flour
80g unsweetened cocoa powder
300g caster sugar
2 teaspoons baking powder
1 teaspoon bicarbonate of soda
1/2 teaspoon salt
3 large eggs, room temperature
240ml buttermilk, room temperature
120ml vegetable oil
240ml hot strong brewed coffee
2 teaspoons vanilla extract
Graham cracker layer:
200g digestive biscuits or graham crackers, finely crushed
60g unsalted butter, melted
2 tablespoons caster sugar
1/4 teaspoon cinnamon
Chocolate ganache filling:
200g dark chocolate, finely chopped
180ml heavy cream
1 tablespoon unsalted butter
Toasted marshmallow frosting:
4 large egg whites
250g caster sugar
1/4 teaspoon cream of tartar
1 teaspoon vanilla extract
1 pinch salt
Decoration:
Extra graham cracker crumble
Mini marshmallows
Broken graham cracker pieces
Extra ganache drizzle
- Crush 200g digestive biscuits or graham crackers to a fine sandy texture
- Mix crushed biscuits with melted butter, sugar, and cinnamon until evenly coated
- Press two-thirds of the mixture firmly into a 20cm disc on a parchment-lined tray
- Freeze the disc for at least 30 minutes until completely firm
- Reserve remaining cracker mixture for topping decoration
- Preheat oven to 175°C fan or 180°C conventional for at least 20 minutes
- Grease two 20cm round tins, line bases with parchment, and grease parchment
- Sift plain flour, cocoa powder, baking powder, bicarbonate of soda, and salt into a large bowl
- Add caster sugar and whisk dry ingredients together for 20 seconds
- Whisk room temperature eggs, buttermilk, vegetable oil, and vanilla extract together in a jug
- Pour wet mixture into dry ingredients and fold until just combined with no dry flour streaks
- Pour hot coffee slowly into the batter while folding gently
- Divide batter evenly between both prepared tins and tap each tin 3 to 4 times
- Bake on centre rack for 30 to 35 minutes without opening door in the first 25 minutes
- Test with skewer at 30 minutes — moist crumbs means done, wet batter means 3 more minutes
- Cool in tins for 15 minutes then invert onto a wire rack and peel off parchment
- Cool completely for at least 45 minutes before assembling
- Place finely chopped dark chocolate in a heatproof bowl
- Heat heavy cream until just simmering then pour immediately over the chocolate
- Leave undisturbed for 60 seconds then stir gently from the centre outward until smooth and glossy
- Add butter and stir until fully melted and incorporated
- Cool ganache at room temperature for 45 to 60 minutes until thick and spreadable
- Combine egg whites, caster sugar, cream of tartar, and salt in a heatproof bowl over simmering water
- Stir continuously for 4 to 5 minutes until sugar fully dissolves and mixture feels warm
- Remove from heat, add vanilla extract, and whisk on high speed for 6 to 8 minutes
- Stop whisking when meringue is bright white, cool, and holds stiff glossy peaks
- Place first cooled chocolate layer on a serving plate
- Spread half the ganache across the top surface evenly
- Remove frozen graham cracker disc from freezer and rest for 5 minutes
- Carefully position the disc on top of the ganache layer and press gently to seat flat
- Spread remaining ganache across the top of the disc
- Place second chocolate layer on top and press gently to seat flat
- Apply marshmallow frosting generously to the top and sides of the assembled cake
- Use the back of a spoon to create dramatic swirls and peaks across the entire surface
- Hold kitchen torch 5 to 8cm above the frosting and move in slow circular motions to toast
- Toast until peaks are deep golden-brown with lighter areas in the valleys
- Scatter reserved graham cracker crumble across the toasted frosting immediately
- Scatter mini marshmallows and broken graham cracker pieces across the top
- Drizzle extra ganache in a loose random pattern over the entire top
- Serve within 3 to 4 hours of assembly for the best frosting texture and appearance
FAQs
Q1: Can I make this cake without a kitchen torch?
Yes — the grill method works well as a substitute. Place the fully frosted cake on the highest oven shelf under a maximum grill setting and watch constantly. The entire top surface toasts in approximately 60 to 90 seconds under direct grill heat. The result is slightly less controlled than a torch but still produces a genuine toasted marshmallow appearance and flavour across the frosting surface.
Q2: Can I use store-bought marshmallow fluff instead of Swiss meringue?
Marshmallow fluff can substitute in a pinch but does not produce the same result. It is much sweeter than Swiss meringue, does not whip to the same volume or stiffness, and browns less evenly under the torch. It also tends to weep more quickly after application. Swiss meringue frosting made from scratch delivers a significantly better texture, appearance, and toastable quality for this specific recipe.
Q3: Can I substitute regular biscuits for graham crackers?
Yes — digestive biscuits are the most common and readily available substitute in countries where graham crackers are not sold. Digestive biscuits have a slightly less sweet, more wheaten flavour than graham crackers, which some people prefer. Hobnobs also work well and add an oat-flavoured character that pairs nicely with the chocolate layers. Use any plain, not-too-sweet biscuit that produces a fine, sandy crumb when crushed.
Wrapping It Up
This s’mores layer cake recipe delivers every element of a campfire s’more in a structured, impressive celebration cake. Make the graham cracker disc ahead and freeze it, bake the chocolate layers and cool them completely, prepare a smooth ganache, whip Swiss meringue frosting to stiff glossy peaks, assemble with ganache as both filling and adhesive, frost generously with marshmallow peaks, and torch immediately before serving. Those seven habits produce a genuinely spectacular result every single time.
Whether you make this for a s’mores birthday layer cake celebration or simply because you want the most fun, most crowd-pleasing cake your kitchen has ever produced — this recipe delivers. Now go find a kitchen torch and get baking.