Purple velvet cake belongs to a very specific category of bakes — the ones that people notice before they taste and remember long after the plate is cleared. I made this royal purple velvet cake recipe for a friend’s birthday last year and the first response from every person at the table was silence followed immediately by the question “how did you make that colour?” That is a very satisfying reaction.
This easy purple velvet cake homemade version uses the classic velvet cake technique — buttermilk, cocoa, and vinegar for that signature tender crumb — combined with deep purple gel food colouring for a vivid, jewel-toned interior that looks extraordinary against bright white cream cheese frosting. The flavour is smooth, mildly chocolatey, and slightly tangy from the buttermilk. The appearance is what most people describe as genuinely royal. And honestly, they are not wrong.
What You’ll Need (Ingredients)
Every ingredient here serves the final result. The purple gel colouring is the only item you may need to source specifically — everything else lives at a regular supermarket.
For purple velvet cake layers:
- 250g (2 cups) plain flour
- 2 tablespoons unsweetened cocoa powder — standard, not Dutch-processed
- 300g (1.5 cups) caster sugar
- 2 teaspoons baking powder
- 1 teaspoon bicarbonate of soda
- 1/2 teaspoon salt
- 3 large eggs, room temperature
- 240ml (1 cup) buttermilk, room temperature
- 120ml (1/2 cup) vegetable oil
- 240ml (1 cup) hot water
- 2 teaspoons vanilla extract
- 1 teaspoon white wine vinegar
- 2 to 3 tablespoons purple gel food colouring — always gel, never liquid
Cream cheese frosting:
- 350g (12 oz) full-fat cream cheese, softened at room temperature
- 180g (12.5 tablespoons) unsalted butter, softened at room temperature
- 500g (4.5 cups) icing sugar, sifted
- 2 teaspoons vanilla extract
- 1 pinch of salt
- 1 to 2 tablespoons heavy cream if needed to adjust consistency
For the royal decoration:
- Edible silver or gold leaf
- Purple sugar crystals or edible purple glitter
- Fresh blackberries or dark purple grapes
- A light dusting of purple luster dust through a fine sieve
How to Make It — Full Step-by-Step Process
Step One: Preheat and Prepare the Tins
Set your oven to 175°C (350°F) fan-forced or 180°C (360°F) conventional. Allow a full 20 minutes of preheating time before the tins go in. A fully preheated oven ensures the baking powder and bicarbonate of soda activate at exactly the right moment — too cool and they activate slowly, producing uneven rise and a flat top that makes stacking the layers much more difficult.
Take two 20cm (8 inch) round cake tins and grease them thoroughly with softened butter or cooking spray, covering both the base and all the way up the sides. Cut two circles of baking parchment to fit the base of each tin exactly and press them flat against the greased base. Grease the parchment circles as well. This double layer of protection — greased tin, parchment, greased parchment — guarantees that the vivid purple sponge releases cleanly from the tin after baking without tearing or leaving any crumb behind. Set both prepared tins aside on the counter while you make the batter.
Step Two: Combine and Sift the Dry Ingredients
Sift 250g of plain flour, 2 tablespoons of cocoa powder, 2 teaspoons of baking powder, 1 teaspoon of bicarbonate of soda, and 1/2 teaspoon of salt into a large mixing bowl. Take a balloon whisk and whisk everything together for about 20 seconds to distribute all the raising agents and salt evenly throughout the flour. Add 300g of caster sugar to the bowl and whisk once more for 15 seconds.
This dry-ingredient whisking step prevents pockets of concentrated raising agents from sitting in the flour. Pockets of concentrated bicarbonate of soda cause two problems — they leave a slightly metallic or soapy taste in the part of the cake where they concentrate, and they create uneven rising that produces a lopsided, domed top. Twenty seconds of whisking eliminates both problems completely. Set the bowl aside and prepare the wet ingredients separately.
Step Three: Combine the Wet Ingredients
In a large jug or separate bowl, whisk together 3 room temperature eggs, 240ml of buttermilk, 120ml of vegetable oil, and 2 teaspoons of vanilla extract. Whisk vigorously for about 30 seconds until the mixture looks uniform and slightly pale throughout. Add 1 teaspoon of white wine vinegar and whisk briefly to incorporate.
The buttermilk and vinegar combination works together to create two specific effects in the moist purple velvet cake recipe easy version. The acidity reacts with the bicarbonate of soda and releases carbon dioxide, which provides additional lift and creates an open, slightly tender crumb structure. Additionally, the acid tenderises the gluten networks in the flour, producing a cake that feels noticeably softer and more yielding when eaten than a standard non-acidic sponge. Both effects are essential to the characteristic texture of a proper velvet cake.
Now add the purple gel food colouring to the wet ingredients. Start with 2 tablespoons and whisk through completely. Assess the intensity of the colour in the liquid mixture — it should look a vivid, deep purple throughout. If it looks pale or more pink-purple than deep purple, add the third tablespoon and whisk again. Remember that the batter will lighten slightly during baking as the heat affects the pigments, and the cream cheese frosting applied after baking restores the visual contrast. Add gel colouring generously rather than cautiously — a muted, pale purple sponge inside the cake is a disappointment after all the work of baking.
Step Four: Combine Wet and Dry Ingredients
Pour the wet purple ingredient mixture into the bowl of dry ingredients. Use a large spatula to fold everything together using wide, slow circular motions. Fold until the batter looks just combined with no dry flour streaks remaining. Count your folds as you go and stop firmly at 20 folds if you are unsure — a batter with a few small lumps is significantly better than an over-mixed one.
Over-mixing activates gluten development and produces a tough, chewy cake rather than the tender, soft crumb that defines a good velvet layer cake. The buttermilk adds acidity that slows some gluten development, but it does not prevent it entirely — excessive mixing still damages the crumb structure even in an acidic batter. Fold only until the flour disappears and stop immediately.
Step Five: Add Hot Water to the Batter
Pour 240ml of hot water slowly into the just-combined batter while folding very gently. The batter will thin considerably after the water goes in — this is expected and correct. Do not add flour to compensate.
The hot water serves the same purpose as hot coffee in a chocolate cake recipe — it activates the cocoa powder fully and produces a deeper, more developed flavour from what is a relatively small amount of cocoa in this recipe. Without the hot water, the cocoa sits in the batter partially bloomed and contributes only a faint chocolate undertone. With hot water, it blooms fully and contributes a genuine, rounded depth of flavour that balances the sweetness and the tanginess from the buttermilk. Additionally, the thin batter produced by the hot water addition is what creates the exceptionally moist, fudgy crumb texture in the finished dark purple velvet cake recipe homemade style.
Divide the finished batter evenly between both prepared tins. Pour slowly and evenly, then tap each tin firmly on the counter 3 to 4 times to release any air bubbles sitting near the surface before baking.
Step Six: Bake the Cake Layers
Place both tins on the centre rack of your preheated oven, positioned side by side with at least 5cm of space between them to allow heat circulation around both tins evenly. Bake for 30 to 35 minutes without opening the oven door during the first 25 minutes. Opening the door too early drops the oven temperature suddenly and can cause the partially set batter to sink in the centre — a problem that looks visually obvious in a purple-coloured batter and cannot be fixed with additional baking time.
At 30 minutes, insert a clean skewer into the centre of each layer. The purple colour of the batter makes the standard visual cues — watching the surface darken or pull away from the edges — less reliable than usual, so rely entirely on the skewer test here. A skewer that emerges with a few moist crumbs attached indicates perfect doneness. A skewer with wet, purple batter clinging to it means 3 to 4 more minutes are needed. Check at 3-minute intervals until the skewer comes out clean.
Remove both tins from the oven and place on a wire rack. Allow them to cool in the tins for 15 minutes. After 15 minutes, run a thin knife carefully around the inside edge of each tin to loosen the sides, invert each tin gently onto the wire rack, and peel the parchment circles from the bases. Allow both layers to cool completely — a minimum of 45 minutes at room temperature — before applying any frosting. FYI, cream cheese frosting applied to warm cake melts on contact and becomes impossible to spread cleanly. The full cooling time is genuinely non-negotiable here.
Step Seven: Make the Cream Cheese Frosting
Place 350g of softened room temperature cream cheese and 180g of softened room temperature butter in a large mixing bowl. Beat on medium speed using a hand mixer or stand mixer for 2 to 3 minutes until the mixture looks completely smooth, uniform, and slightly lightened in colour. Both ingredients must be at genuine room temperature — not slightly warmer than fridge temperature, but fully softened to the point where pressing them leaves a clean indent without resistance.
Add the sifted icing sugar in four separate additions, mixing on low speed after each addition until the sugar fully incorporates before adding the next portion. After the final addition, increase to medium-high speed and beat for 2 minutes until the frosting looks smooth, creamy, and bright white. Add 2 teaspoons of vanilla extract and a pinch of salt. Beat for a final 30 seconds to distribute evenly.
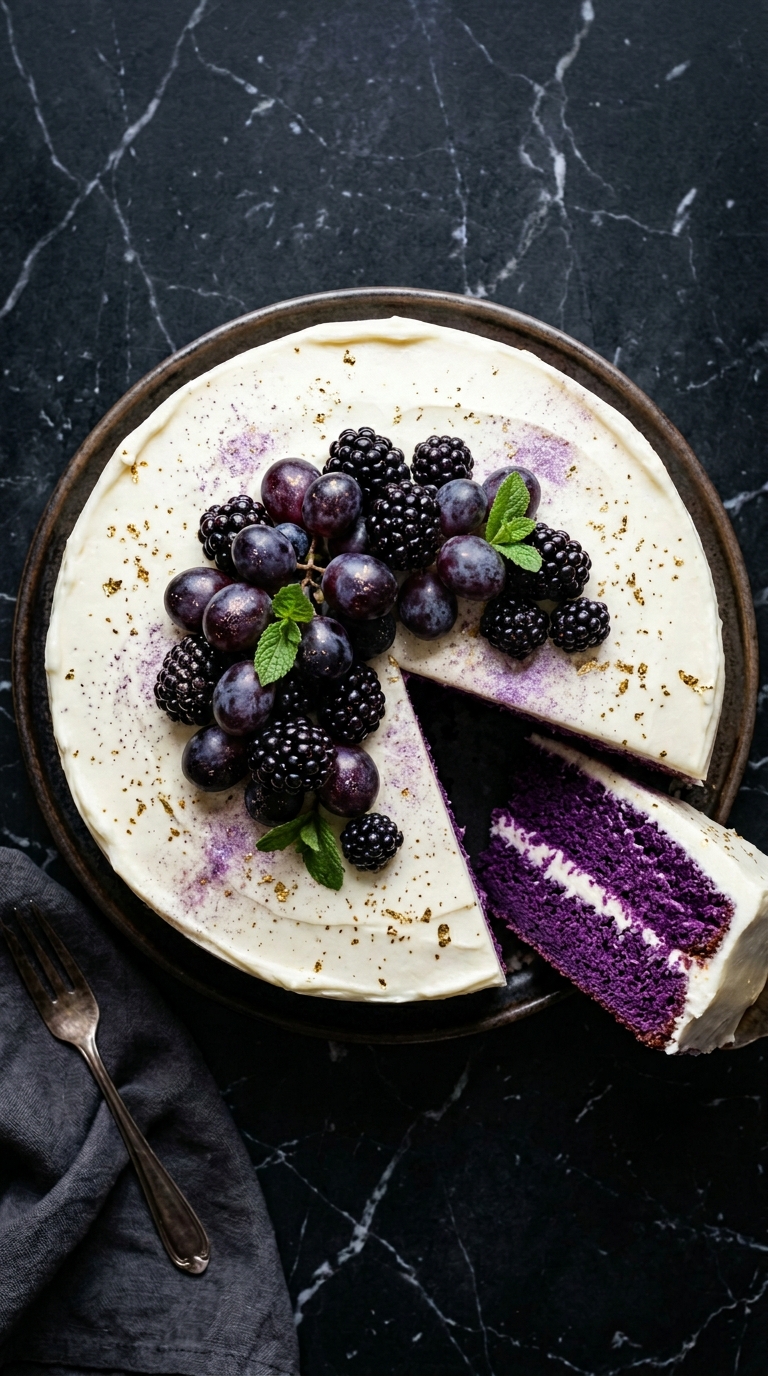
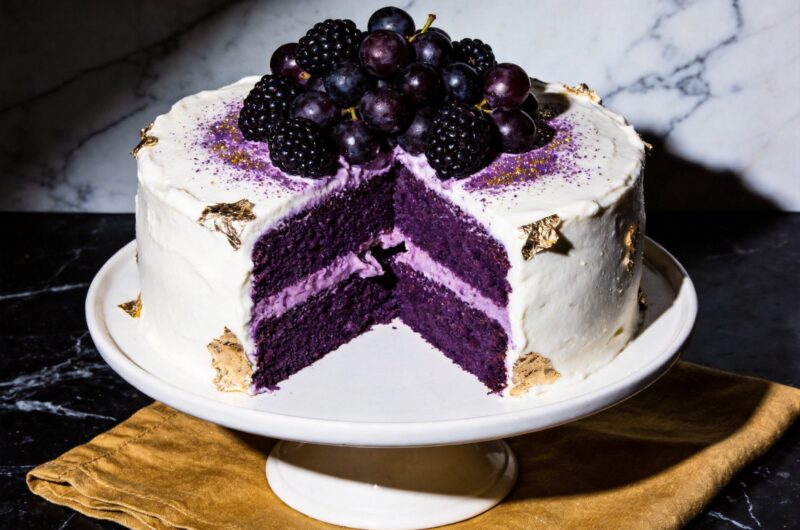
The finished frosting should look pure white, hold soft peaks when you lift the beaters, and spread smoothly across the cake surface without tearing. If it looks too thick to spread easily, add 1 tablespoon of heavy cream and beat briefly. If it looks too soft, refrigerate the bowl for 15 minutes before using. The pure white of the cream cheese frosting against the deep purple velvet sponge creates the signature high-contrast visual of this purple cream velvet layer cake recipe — and that contrast is what makes the cut face of each slice look so extraordinary.
Step Eight: Apply the Crumb Coat
Place one completely cooled purple velvet layer on a flat serving plate or cake board. Spread a generous tablespoon of cream cheese frosting across the top surface and place the second layer on top, pressing very gently to seat it flat and even. Apply a thin, imperfect layer of frosting — approximately 4 to 5 tablespoons total — across the top and sides of the assembled cake using an offset spatula.
This thin first layer is the crumb coat, and it performs one specific, critical job: it seals the vivid purple crumbs from the cake surface against the frosting rather than allowing them to drag through the bright white final layer. Without a crumb coat, purple crumbs mix into the white frosting and turn the entire exterior surface a pale lilac-grey rather than clean white. The visual impact of a pure white frosted surface cut to reveal deep purple layers depends entirely on this step being done properly.
Refrigerate the crumb-coated cake for 20 minutes to firm the first frosting layer completely before applying the final coat.
Step Nine: Apply the Final Frosting and Create the Elegant Finish
Remove the chilled crumb-coated cake from the fridge and apply the remaining cream cheese frosting in a generous, even layer across the top and all sides. Use the offset spatula to work from the centre of the top outward to the edges, then use it vertically against the sides in long, sweeping strokes from the bottom upward.
For the elegant purple velvet cake decoration finish, hold a bench scraper vertically against the frosted sides and rotate the cake slowly on the plate in one continuous direction. This produces clean, even sides with a smooth surface that looks professional and polished. For the royal themed velvet cake design look, leave the sides with very subtle texture marks from the spatula rather than making them completely smooth — this creates a hand-crafted, artisanal quality that suits the regal theme of this cake perfectly.
Step Ten: Decorate for a Royal Presentation
The decoration of this cake should feel genuinely luxurious without requiring specialist skills. The combination of pure white frosting and deep purple sponge already does most of the visual work — the decoration only needs to reinforce the royal, elegant character.
Press small, irregular pieces of edible silver or gold leaf gently onto the frosted sides using a dry soft brush. The metallic leaf catches light and adds an immediately luxurious quality that no other decoration produces as effortlessly. Scatter a small amount of purple sugar crystals or edible purple glitter across the top surface for a shimmer that picks up the purple theme from the cake interior.
Arrange fresh blackberries or dark purple grapes in a loose, generous cluster on top of the frosted surface. The deep, natural purple of the fruit against the white frosting creates a jewel-like quality that suits the luxury royal velvet cake design ideas approach perfectly. Dust very lightly with purple luster dust through a fine sieve across the fruit cluster and the frosting surface around it. Refrigerate the decorated cake for 20 minutes to set everything before slicing. IMO, this combination of gold leaf, fresh fruit, and luster dust produces the most genuinely royal-looking cake you can achieve at home without a single piece of specialist piping equipment. 🙂
Getting the Perfect Purple Colour
Have you ever used purple food colouring and ended up with a cake that came out blue inside, or pink, or an indeterminate shade that could generously be described as aubergine? Purple is one of the most notoriously unstable colours in food colouring because it sits at the intersection of red and blue pigments that react very differently to heat, acidity, and light.
Standard liquid food colouring produces a diluted, unreliable purple that shifts dramatically during baking. Gel food colouring contains a much higher concentration of pigment per drop and produces a far more stable, vivid result. However, even with gel colouring, the acidity of the buttermilk and vinegar in the batter can shift the colour slightly toward blue or pink during mixing — this is a natural chemical reaction and not a problem. The final baked colour stabilises into a deep purple-violet that looks genuinely rich and dramatic in the finished cake.
Use a combination of purple and a single drop of red gel colouring if the initial purple leans too blue for your preference. The drop of red pulls it back toward a warmer, deeper purple without making it pink. This small adjustment is the difference between a truly royal purple velvet cake recipe result and a blue velvet cake with good intentions.
Making It a Purple Wedding or Celebration Cake
The purple wedding velvet cake inspiration version requires only decoration changes from this base recipe. Extend to three layers by baking the same batter quantity in three 18cm tins rather than two 20cm ones — the thinner layers of a three-tier stack give the cake more height and visual drama.
For a wedding aesthetic, pipe a border of large rosettes around the top edge using a star nozzle piping bag filled with cream cheese frosting. Press edible silver leaf into the frosted sides in random, overlapping patches for a metallic texture across the entire exterior. Place a cluster of fresh lavender sprigs, dark grapes, and blackberries in the centre of the top for a genuinely luxurious, natural decoration that photographs beautifully and requires no artificial flowers or fondant work.
For purple velvet cake ideas birthday version, simply add birthday candles in gold or silver holders placed directly into the fruit cluster, scatter gold star sprinkles across the frosted top, and write a short message on the frosting in a thin line of edible gold paint applied with a fine brush. Both celebrations suit this cake perfectly, and neither requires any additional baking beyond the base recipe.
Moist Purple Velvet Layer Cake From Scratch
12
servings30
minutes33
minutesThis royal purple velvet cake combines a moist, tender buttermilk and cocoa sponge tinted deep purple with gel food colouring, layered with bright white cream cheese frosting for a stunning high-contrast finish. Decorated with edible gold leaf, fresh blackberries, and luster dust, it delivers a genuinely regal, elegant celebration cake.
Ingredients
Purple velvet cake layers:
250g plain flour
2 tablespoons unsweetened cocoa powder
300g caster sugar
2 teaspoons baking powder
1 teaspoon bicarbonate of soda
1/2 teaspoon salt
3 large eggs, room temperature
240ml buttermilk, room temperature
120ml vegetable oil
240ml hot water
2 teaspoons vanilla extract
1 teaspoon white wine vinegar
2 to 3 tablespoons purple gel food colouring
Cream cheese frosting:
350g full-fat cream cheese, softened
180g unsalted butter, softened
500g icing sugar, sifted
2 teaspoons vanilla extract
1 pinch salt
1 to 2 tablespoons heavy cream if needed
Decoration:
Edible silver or gold leaf
Purple sugar crystals or edible purple glitter
Fresh blackberries or dark purple grapes
Purple luster dust for dusting
- Preheat oven to 175°C fan or 180°C conventional for at least 20 minutes
- Grease two 20cm round tins, line bases with parchment, and grease parchment
- Sift plain flour, cocoa powder, baking powder, bicarbonate of soda, and salt into a large bowl
- Add caster sugar and whisk dry ingredients together for 20 seconds
- Whisk room temperature eggs, buttermilk, vegetable oil, and vanilla extract together in a jug
- Add white wine vinegar to the wet ingredients and whisk briefly
- Add purple gel food colouring to the wet ingredients and whisk until fully incorporated and deeply coloured
- Pour wet mixture into the dry ingredients bowl
- Fold together with a spatula until just combined with no dry flour streaks — count 20 folds maximum
- Pour hot water slowly into the batter while folding very gently
- Divide batter evenly between both prepared tins
- Tap each tin firmly on the counter 3 to 4 times to release air bubbles
- Bake on centre rack for 30 to 35 minutes without opening door in the first 25 minutes
- Test with a skewer at 30 minutes — moist crumbs means done, wet batter means 3 more minutes
- Cool in tins for 15 minutes then invert onto a wire rack and peel off parchment
- Cool completely for at least 45 minutes before assembling
- Beat softened cream cheese and softened butter together on medium speed for 2 to 3 minutes until smooth
- Add sifted icing sugar in four additions mixing on low between each addition
- Beat on medium-high for 2 minutes after final addition until smooth and bright white
- Add vanilla extract and salt and beat for 30 seconds more
- Add heavy cream one tablespoon at a time if frosting needs loosening
- Place first cooled layer on a serving plate
- Spread a tablespoon of frosting across the top and place second layer on top
- Press gently to seat flat and even
- Apply a thin crumb coat of frosting across the top and sides of the assembled cake
- Refrigerate for 20 minutes to firm the crumb coat completely
- Apply remaining frosting in a generous even layer across the top and sides
- Smooth sides using a bench scraper held vertically while rotating the cake
- Press small pieces of edible gold or silver leaf onto the frosted sides using a dry soft brush
- Scatter purple sugar crystals or edible glitter across the top surface
- Arrange fresh blackberries or dark grapes in a loose cluster on top
- Dust lightly with purple luster dust through a fine sieve over the fruit and frosting
- Refrigerate for 20 minutes to set everything before slicing and serving
Common Mistakes to Avoid
Using liquid food colouring: Liquid colouring adds too much moisture to the batter, dilutes the colour concentration, and produces an unstable purple that shifts to blue or grey during baking. Always use gel colouring and add it generously rather than cautiously.
Skipping the crumb coat: Purple crumbs dragged through white frosting produce a streaky, grey-purple exterior rather than the clean white surface this cake depends on for its visual impact. The crumb coat takes 5 minutes and makes a dramatic difference to the final appearance.
Under-creaming the frosting: Cream cheese frosting beaten for less than 2 minutes produces a dense, slightly grainy texture that spreads poorly. Both the cream cheese and butter must be at genuine room temperature and beaten for the full time to produce the smooth, pipeable consistency this recipe needs. :/
Cooling the cake in the fridge to save time: Cooling cake in the fridge rather than at room temperature causes the outside to cool faster than the inside, creating condensation on the surface that makes frosting application inconsistent and messy. Always cool at room temperature for the full 45 minutes.
FAQs
Q1: Why did my purple cake turn blue or grey after baking?
Purple food colouring shifts colour during baking because of heat and the acidity in the batter from the buttermilk and vinegar. This reaction is normal and chemical rather than a sign that something went wrong. Using a higher quality purple gel colouring with a warm red bias rather than a cool blue bias helps significantly. Adding a single drop of red gel colouring to the wet ingredients before baking also stabilises the colour toward a warmer, truer purple.
Q2: Can I make this recipe without buttermilk?
Yes — make a substitute by adding 1 tablespoon of white wine vinegar or lemon juice to 240ml of whole milk. Stir briefly and leave for 5 minutes until the milk curdles visibly. This homemade buttermilk substitute replicates the acidity and fat content of commercial buttermilk and works identically in the batter. Reduce the additional white wine vinegar in the recipe to 1/2 teaspoon when using the substitute to avoid over-acidifying the batter.
Q3: How do I make the purple colour more vivid in the finished cake?
Use a purple gel colouring specifically formulated for baking rather than standard food colouring gel. Brands such as Americolor Electric Purple, Sugarflair Grape Violet, or Wilton Violet produce the most vivid results reliably. Additionally, using standard cocoa powder rather than Dutch-processed cocoa preserves more of the purple pigment during baking — Dutch-processed cocoa has a higher pH that reacts more aggressively with the food colouring.
Wrapping It Up
This royal purple velvet cake recipe delivers a genuinely stunning, deeply flavoured, regal-looking cake using straightforward baking technique and one specialist ingredient — purple gel food colouring. Use gel colouring in adequate quantity, sift the dry ingredients, fold the batter to just combined, add hot water last, cool completely before frosting, apply a proper crumb coat, and decorate with edible gold leaf and fresh dark fruit for maximum visual impact. Those seven habits produce a perfect purple cream velvet layer cake recipe result every single time.
Whether you bake it for a birthday, a wedding, or simply because you want the most visually dramatic cake in the room — this recipe delivers completely. Now go source some good purple gel colouring and make something genuinely regal.