My first batch of macarons looked like sad, cracked pancakes. My second batch wasn’t much better. However, by the third attempt, I finally understood what actually mattered — and since then, I’ve never had a failed batch.
Macarons have a reputation for being complicated baking recipes that only professionals can master. That reputation is mostly exaggerated. Because the process is actually quite logical once you understand the why behind each step, anyone can make them successfully at home.
What You’ll Need (Ingredients)
Precision matters here more than in almost any other recipe. Use a kitchen scale — cups and spoons won’t give you the accuracy this recipe needs.
For the macaron shells:
- 100g (3.5 oz) almond flour, finely ground
- 100g (3.5 oz) icing sugar
- 75g (2.6 oz) egg whites, aged at room temperature (from approximately 2 large eggs)
- 75g (2.6 oz) caster sugar
- 1/4 teaspoon cream of tartar
- Gel food colouring of your choice (optional)
For the classic buttercream filling:
- 120g (4.2 oz) unsalted butter, softened at room temperature
- 200g (7 oz) icing sugar, sifted
- 2 tablespoons heavy cream
- 1 teaspoon vanilla extract
- 1 pinch of salt
How to Make It — Full Step-by-Step Process
Step 1: Prepare and Sift the Dry Ingredients
Here is where most beginners skip a critical detail. Sifting is not optional — it directly affects how smooth your macaron shells turn out.
- Measure 100g of almond flour and 100g of icing sugar separately using a kitchen scale.
- Combine both ingredients together in a large mixing bowl.
- Sift the mixture through a fine mesh sieve into a clean bowl below.
- Discard any large almond pieces that don’t pass through the sieve — these create bumpy shells.
- Repeat the sifting process a second time for an extra-smooth result.
- Why this matters: Fine, lump-free dry ingredients produce a smoother batter and a flatter, more even shell surface.
Step 2: Age and Prepare Your Egg Whites
This step surprises most beginners. However, it makes a genuine difference to the final result.
- Separate your egg whites from the yolks carefully — even a tiny drop of yolk prevents proper whipping.
- Measure exactly 75g of egg whites using your kitchen scale.
- Age the egg whites by leaving them uncovered in a clean bowl at room temperature for at least 30 minutes before using. Alternatively, age them overnight in the fridge uncovered, then bring to room temperature before whipping.
- Why this matters: Aged egg whites have lower moisture content. As a result, they whip into a more stable meringue that holds its structure better during baking.
- Check that your mixing bowl and whisk are completely clean and grease-free before you begin whipping. Any grease prevents the whites from reaching full volume.
Step 3: Make the French Meringue
The meringue is the backbone of this recipe. Getting it right makes everything else far easier.
- Add the 75g of room temperature egg whites to your clean mixing bowl.
- Begin whipping on medium speed using a hand mixer or stand mixer.
- Watch for the whites to turn foamy and opaque — this takes about 1 to 2 minutes at medium speed.
- Add 1/4 teaspoon of cream of tartar once the whites look foamy. This stabilises the meringue and helps it hold stiff peaks reliably.
- Increase the mixer speed to medium-high and continue whipping.
- Add the 75g of caster sugar gradually — one tablespoon at a time — while the mixer runs continuously.
- Continue whipping after all the sugar is added until the meringue reaches stiff, glossy peaks. This usually takes 5 to 7 minutes total from when you started whipping.
- Test the meringue by turning the bowl upside down. If it stays firmly in place without sliding, it is ready.
- Why this matters: Under-whipped meringue produces flat macarons without feet. Over-whipped meringue becomes dry and causes cracked shells. Stiff, glossy peaks are exactly what you need.
- Add gel food colouring now if using. Fold it in gently with a spatula — just 2 to 3 folds — before starting the macaronage process.
Step 4: Macaronage — Fold the Batter Correctly
This is the most important technique in the entire recipe. Macaronage is the process of folding the dry ingredients into the meringue to the correct consistency.
- Add the sifted almond flour and icing sugar mixture to the meringue bowl all at once.
- Begin folding using a wide silicone spatula. Use a downward scraping motion along the bottom of the bowl, then fold up and over the top.
- Continue folding firmly but smoothly. You are deliberately deflating the meringue slightly — this is intentional and correct.
- Test the batter regularly as you fold. Lift the spatula and let batter fall from it — it should flow off in a thick, continuous ribbon rather than dropping in chunks.
- Stop folding when the batter flows like lava and a ribbon of batter disappearing back into the bowl within 10 seconds. This is the correct consistency.
- Why this matters: Under-folded batter produces lumpy shells with peaks that don’t flatten. Over-folded batter produces flat, spread-out shells with no feet. The ribbon test tells you exactly when to stop.
- Count your folds if you find the ribbon test confusing — most batters reach the correct consistency between 40 and 60 folds total.
Step 5: Pipe the Macaron Shells
Consistent size and shape produce even baking results. Take a few minutes to set this up properly.
- Prepare two large baking trays by lining them with parchment paper or silicone baking mats.
- Draw 3.5cm (1.4 inch) circles on the back of your parchment paper using a pencil as piping guides. Flip the paper over so the pencil marks face down.
- Fill a piping bag fitted with a round 1cm nozzle with the macaron batter.
- Hold the piping bag straight up and down — perpendicular to the tray — with the nozzle about 1cm above the surface.
- Pipe the batter in a steady, controlled circle using your circle guides. Stop squeezing, then flick the nozzle away quickly to avoid creating a peak on top.
- Tap the baking trays firmly on the counter 4 to 5 times after piping each tray. This removes air bubbles trapped inside the batter and helps the shells settle into a flat, even surface.
- Pop any remaining visible air bubbles on the surface using a clean toothpick.
- Why this matters: Air bubbles left inside the shells expand during baking and cause cracked tops — tapping the trays is the easiest way to prevent this.
Step 6: Rest the Shells Before Baking
This step frustrates impatient bakers everywhere. However, skipping it is one of the most common reasons macarons fail.
- Leave the piped trays at room temperature uncovered for 30 to 60 minutes.
- Check the shells are ready by lightly touching one with your fingertip. It should feel dry, matte, and non-sticky — the batter should not stick to your finger at all.
- Wait longer if the shells still feel tacky — in humid environments this can take up to 90 minutes.
- Why this matters: Resting allows a thin skin to form on the surface of each shell. This skin directs the rising batter downward during baking, which creates the signature ruffled “feet” at the base of each macaron.
Step 7: Bake the Macarons
Oven temperature is critical here. Every oven behaves differently, so use these guidelines as a starting point.
- Preheat your oven to 150°C (300°F) fan-forced, or 160°C (320°F) conventional. Do this at least 20 minutes before baking.
- Place one tray at a time in the centre rack of the oven. Baking one tray at a time ensures even heat distribution throughout.
- Bake for 13 to 15 minutes without opening the oven door during baking. Opening the door causes a sudden temperature drop that can collapse the shells.
- Check doneness by gently nudging a shell sideways with your finger at the 13-minute mark. A properly baked shell moves as one solid piece with its feet. An underbaked shell wobbles or the top slides separately from the base.
- Remove from the oven and allow the trays to cool completely on a wire rack before attempting to peel the shells off. This takes about 20 minutes.
- Why this matters: Removing shells while warm tears the bottoms and ruins their appearance. Full cooling allows them to release cleanly every time.
Step 8: Make the Buttercream Filling
While the shells cool, prepare the macaron filling. This classic vanilla buttercream is the perfect starting point.
- Beat 120g of softened unsalted butter in a bowl using a hand mixer on medium speed for 2 minutes until pale and fluffy.
- Add 200g of sifted icing sugar gradually — roughly 50g at a time — while mixing on low speed to avoid a sugar cloud.
- Increase the speed to medium-high and beat for a further 2 minutes until light and smooth.
- Add 1 teaspoon of vanilla extract, 2 tablespoons of heavy cream, and a pinch of salt.
- Beat for one final minute until the filling looks silky, holds its shape, and spreads easily.
- Transfer to a piping bag fitted with a small round nozzle, ready for filling.
Step 9: Fill and Sandwich the Macarons
The final step transforms individual shells into finished macarons. Take care to match shells of similar size together.
- Sort the cooled shells into pairs of matching sizes on your work surface.
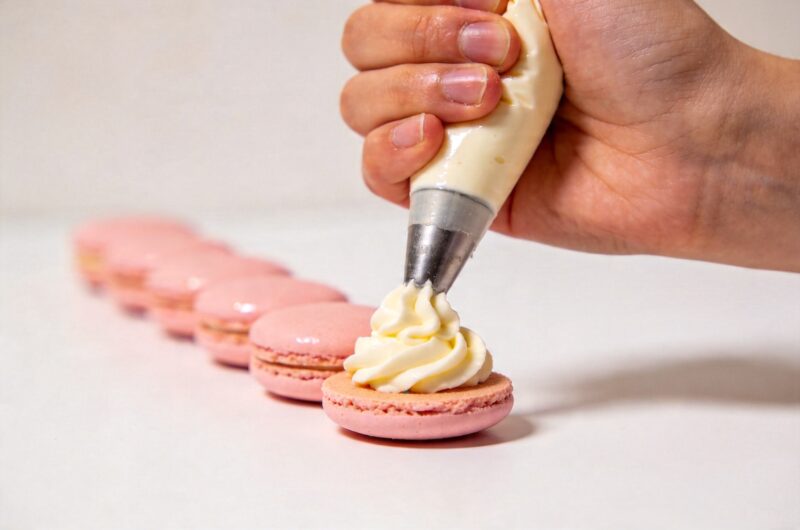
- Pipe a small mound of buttercream — about 1 teaspoon worth — onto the flat side of one shell from each pair.
- Press the matching shell on top gently and twist very slightly to spread the filling evenly to the edges without squeezing it out.
- Refrigerate the filled macarons in an airtight container for at least 24 hours before eating. This resting period is called “maturing.”
- Why this matters: Maturing allows the filling to soften the inner surface of the shells slightly. As a result, the texture transforms from crisp throughout to the signature crisp exterior with a soft, chewy interior that defines the best macarons.
Macaron Filling Ideas Beyond Basic Buttercream
Have you ever wondered why macaron flavors ideas feel endless at patisseries? Because the shells themselves are neutral enough to pair with almost anything. Here are some popular macaron filling recipe options worth trying:
Sweet Fillings
- Raspberry jam buttercream — fold 2 tablespoons of seedless raspberry jam into the base buttercream
- Chocolate ganache — melt 100g dark chocolate with 80ml warm cream, cool until spreadable
- Lemon curd filling — use 3 tablespoons of store-bought or homemade lemon curd mixed into buttercream
- Salted caramel — drizzle thick salted caramel sauce into the base buttercream and fold through
- Pistachio cream — blend 2 tablespoons of pistachio paste into the buttercream for a nutty, rich result
How to Make Flavoured Shells
Learning how to make flavoured macarons is simpler than most people think. Here are quick flavour additions that work directly in the shell batter:
- Cocoa shells — replace 10g of almond flour with 10g of unsweetened cocoa powder
- Matcha shells — replace 8g of almond flour with 8g of matcha powder
- Lavender shells — add 1/4 teaspoon of dried culinary lavender to the dry ingredients before sifting
- Strawberry shells — add 1 teaspoon of strawberry powder to the dry mixture and use pink gel colouring
French Macaron Recipe for Beginners With Easy Steps
Course: Deserts24
servings30
minutes30
minutes95 per
kcal12
minutesThis easy French macaron recipe uses almond flour, meringue, and a classic vanilla buttercream filling to create light, crisp shells with a chewy interior. With exact measurements, clear folding technique guidance, and full troubleshooting tips, this beginner-friendly guide gives you the best chance of perfect macarons on your very first attempt.
Ingredients
Macaron shells:
100g almond flour, finely ground
100g icing sugar
75g egg whites, aged at room temperature
75g caster sugar
1/4 teaspoon cream of tartar
Gel food colouring (optional)
Buttercream filling:
120g unsalted butter, softened
200g icing sugar, sifted
2 tablespoons heavy cream
1 teaspoon vanilla extract
1 pinch of salt
- Measure 100g almond flour and 100g icing sugar separately.
- Combine both in a bowl, then sift through a fine mesh sieve twice.
- Discard any large almond pieces that don’t pass through.
- Separate 75g of egg whites carefully into a clean bowl.
- Leave uncovered at room temperature for at least 30 minutes before whipping.
- Whip egg whites on medium speed until foamy.
- Add cream of tartar, then increase to medium-high speed.
- Add caster sugar one tablespoon at a time while mixing continuously.
- Whip until stiff, glossy peaks form — about 5 to 7 minutes total.
- Add the sifted dry ingredients to the meringue all at once.
- Fold using a wide spatula in a scrape-and-fold motion.
- Stop when the batter flows in a thick ribbon and disappears back into the bowl within 10 seconds.
- Fill a piping bag with a 1cm round nozzle with the batter.
- Pipe 3.5cm circles onto parchment-lined baking trays.
- Tap trays firmly on the counter 4 to 5 times to remove air bubbles.
- Leave piped trays uncovered at room temperature for 30 to 60 minutes.
- Test readiness by touching lightly — shells should feel dry and non-sticky.
- Preheat oven to 150°C fan or 160°C conventional.
- Bake one tray at a time on the centre rack for 13 to 15 minutes.
- Cool completely on the tray before removing shells.
- Beat softened butter for 2 minutes until pale and fluffy.
- Add sifted icing sugar gradually while mixing on low.
- Add vanilla, cream, and salt, then beat on medium-high for 1 minute until silky.
- Match shells into pairs by size.
- Pipe a small mound of buttercream onto the flat side of one shell from each pair.
- Press the matching shell on top gently and twist slightly.
- Refrigerate in an airtight container for 24 hours before eating.
Tips for Making Macarons Successfully Every Time
These tips for making macarons come directly from repeated testing. Each one addresses a specific, common failure point.
- Use a kitchen scale always — volume measurements like cups are not precise enough for this recipe
- Age your egg whites — even 30 minutes at room temperature makes a noticeable difference to meringue stability
- Sift twice — one sift is not always enough to remove all almond lumps
- Avoid liquid food colouring — it adds moisture to the batter and destabilises the meringue; use gel colouring only
- Test your oven temperature — use an oven thermometer to verify your oven runs at the correct temperature; many ovens run 10 to 20 degrees hotter or cooler than the dial suggests
- Don’t skip resting — rushing macarons into the oven without forming a skin is the single most common beginner mistake
- Mature the filled macarons — 24 hours in the fridge transforms the texture completely and is absolutely worth the wait
FYI, if your macarons develop feet but crack on top, your oven temperature is likely too high. Reduce it by 5 to 10 degrees on your next batch.
Why Macarons Make Great Products to Sell
Macarons rank consistently among the best desserts to sell at bake sales, markets, and online. Because they look impressive and taste distinctive, customers perceive them as premium products and pay accordingly.
A batch of 24 macarons costs roughly the same as a batch of basic cookies to produce. However, they sell for significantly more because of their visual appeal and reputation. IMO, mastering this homemade macaron recipe is one of the smartest investments any home baker can make.
FAQs
Q1: Why did my macarons come out flat with no feet?
Flat macarons without feet usually point to one of three causes. The meringue may have been under-whipped and too soft to hold structure. Additionally, the batter may have been over-folded during macaronage, removing too much air. Finally, skipping the resting step prevents the skin from forming — and without that skin, feet cannot develop during baking.
Q2: Why did my macaron shells crack on top?
Cracked shells most commonly happen because the shells went into the oven before forming a proper skin. Additionally, oven temperature that runs too high causes the shells to rise too fast and crack. Try lowering your oven temperature by 10 degrees and always ensure shells feel completely dry and matte before baking.
Q3: Can I make macarons without almond flour?
Yes, though the result differs slightly. Sunflower seed flour works as the most reliable substitute and produces a similar texture. However, it can cause the shells to turn slightly green due to a natural reaction with baking — adding a few drops of red gel colouring to the batter counteracts this effectively.
Q4: How long do macarons keep once filled?
Filled macarons keep well in an airtight container in the fridge for up to 5 days. For longer storage, freeze them in a single layer on a tray first, then transfer to a freezer bag once solid. They keep in the freezer for up to 3 months and thaw beautifully at room temperature within 20 minutes.
Q5: Do I need a stand mixer to make macarons?
No, a good quality hand mixer works perfectly well. The key requirement is that your mixer can sustain consistent medium-high speed for 5 to 7 minutes without overheating. However, a stand mixer with a whisk attachment does make the meringue stage easier because it frees your hands to prepare other things simultaneously.
Wrapping It Up
This easy macarons recipe gives you everything you need to succeed from the very first batch. Sift twice, age your egg whites, nail the macaronage, rest the shells, and mature the finished macarons for 24 hours. Follow those five rules and the results will surprise you every single time.
Macarons are not as complicated as their reputation suggests. They just require attention and patience — and both of those things are completely within your control. Now go make a batch.