Coffee and cheesecake should have been combined far sooner than they were. The moment the two meet — tangy cream cheese, rich espresso, buttery biscuit base — the result tastes so completely right that you wonder why you ever made plain cheesecake at all. I made this coffee cheesecake recipe homemade version for a dinner party last winter and not a single crumb made it back to the kitchen.
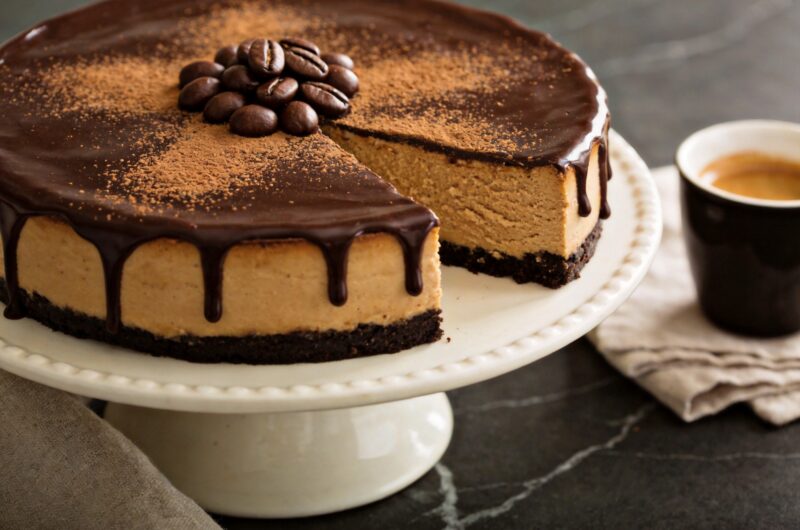
This baked coffee cheesecake easy recipe delivers a genuinely creamy, dense, espresso-forward filling baked over a dark chocolate and digestive biscuit base. The coffee flavour builds gradually on the palate rather than hitting all at once — rich, smooth, and slightly bitter in exactly the right proportions. Paired with a thin mocha ganache topping, it looks and tastes like something from a serious patisserie counter.
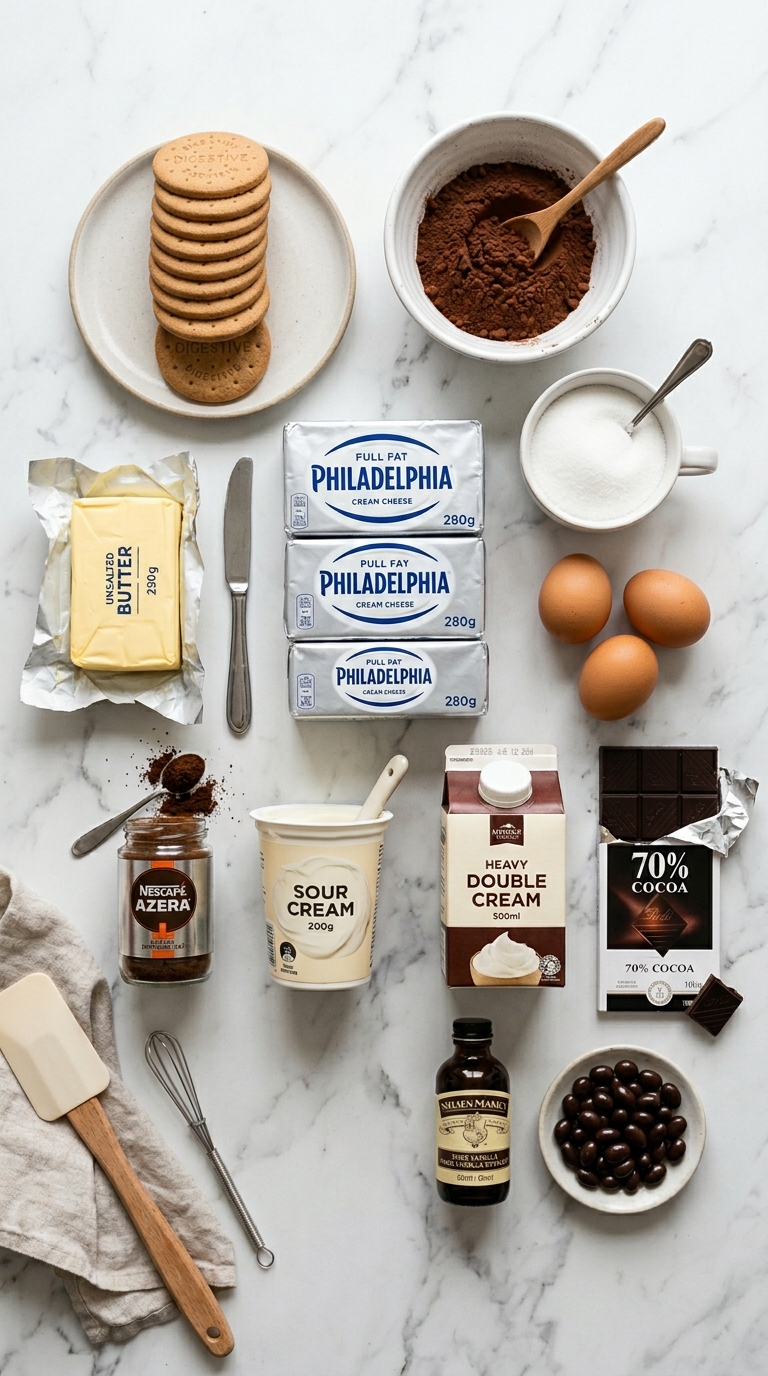
What You’ll Need (Ingredients)
Every ingredient here contributes specifically to the final result. Nothing is filler.
For biscuit base:
- 200g (about 14) digestive biscuits or Oreo cookies, finely crushed
- 30g (2 tablespoons) unsweetened cocoa powder
- 80g (5.5 tablespoons) unsalted butter, melted
- 2 tablespoons caster sugar
Coffee cheesecake filling:
- 700g (24.5 oz) full-fat cream cheese, softened at room temperature
- 200g (1 cup) caster sugar
- 3 large eggs, room temperature
- 200ml (3/4 cup) sour cream, room temperature
- 2 tablespoons instant espresso powder dissolved in 2 tablespoons hot water — cooled completely
- 1 teaspoon vanilla extract
- 1 tablespoon plain flour — this prevents cracking
Mocha ganache topping:
- 150g (5.3 oz) dark chocolate, finely chopped
- 120ml (1/2 cup) heavy cream
- 1 teaspoon instant espresso powder
- 1 tablespoon unsalted butter
For decoration:
- Chocolate covered espresso beans
- A light dusting of cocoa powder through a fine sieve
- A few chocolate shavings
How to Make It — Full Step-by-Step Process
Step One: Make the Chocolate Biscuit Base
Place 200g of digestive biscuits into a food processor and pulse until finely crushed to a uniform sandy texture with no large pieces remaining. Add 30g of cocoa powder and 2 tablespoons of caster sugar to the crumbs and pulse once more for 10 seconds to distribute evenly throughout. Transfer the mixture to a medium bowl and pour in 80g of melted butter. Mix with a fork until every crumb is evenly coated and the mixture holds together when pressed firmly between your fingers.
Tip the base mixture into a 23cm (9 inch) springform tin. Use the back of a flat-bottomed glass or the base of a measuring cup to press it firmly and evenly across the entire base and about 2.5cm up the sides. Even, consistent thickness prevents the base from crumbling unevenly when sliced. Press firmly rather than gently — a loosely packed base falls apart when the cheesecake is cut.
Refrigerate the pressed base for 20 minutes while you prepare the filling. Cold butter in the base firms the mixture and creates a sturdier platform for the heavy cream cheese filling above. Do not skip this chilling step — a warm, soft base shifts and compresses under the weight of the filling during baking and produces an uneven result.
Step Two: Prepare the Springform Tin
Preheat your oven to 160°C (320°F) fan-forced or 165°C (330°F) conventional. This lower-than-usual baking temperature is deliberate and essential for cheesecake — high heat causes the edges to set and puff before the centre has time to cook through, producing cracks across the surface. Lower temperature allows the entire filling to set gradually and evenly from the outside in.
Wrap the outside of the springform tin tightly in two layers of heavy-duty foil, covering the base and coming up at least halfway up the sides. This foil barrier waterproofs the tin for the water bath — a method that regulates oven heat and produces an exceptionally smooth, crack-free cheesecake surface. Place the wrapped tin inside a large roasting tray and set aside. Fill a kettle with water and have it ready to boil.
The water bath sounds intimidating if you have never used one before, but the technique is genuinely straightforward. The boiling water simply creates a humid, temperature-regulated environment inside the oven that bakes the cheesecake more gently than dry oven heat alone. It also reduces the risk of the top cracking to almost zero. FYI — this single technique is what separates a professional-quality creamy espresso cheesecake dessert from a cracked, uneven homemade one.
Step Three: Make the Coffee Cheesecake Filling
Place 700g of room temperature cream cheese in a large mixing bowl and beat on medium speed for 2 minutes until completely smooth with no lumps remaining. Room temperature cream cheese is essential here — cold cream cheese does not beat smooth and leaves tiny lumps throughout the filling that bake into small dense patches in the finished cheesecake. Add 200g of caster sugar and beat for 1 more minute until fully incorporated.
Add the 3 room temperature eggs one at a time, beating on low speed for 20 seconds after each addition. Add each egg on low speed rather than medium — high-speed beating after adding eggs incorporates too much air into the filling, and excess air causes the cheesecake to puff dramatically during baking and then collapse and crack as it cools. Low speed produces a dense, creamy filling that holds its shape perfectly. Add 200ml of room temperature sour cream, 1 teaspoon of vanilla extract, and 1 tablespoon of plain flour. Beat on low until just combined.
Add the cooled espresso mixture — 2 tablespoons of instant espresso powder dissolved in 2 tablespoons of hot water — to the filling and fold through gently with a spatula until evenly distributed and the filling looks a uniform latte-brown colour throughout. Taste at this stage. The filling should taste strongly of coffee-flavoured tangy cream cheese — noticeably bold because the baking process and chilling will mellow the flavour significantly. Pour the finished filling over the chilled biscuit base and smooth the surface with an offset spatula.
Step Four: Bake Using the Water Bath Method
Pour the finished filling over the chilled biscuit base and smooth the top completely flat using an offset spatula. Place the foil-wrapped tin inside the roasting tray on the centre rack of the preheated oven. Pour boiling water into the roasting tray around the outside of the springform tin until the water level reaches approximately halfway up the sides of the tin. Work carefully and avoid splashing water into the filling.
Bake for 50 to 60 minutes. At 50 minutes, open the oven and gently nudge the roasting tray. The cheesecake should look set around the edges with a circle of about 8 to 10cm in the very centre that still looks slightly glossy and wobbles gently when moved — similar to the movement of a loosely set jelly. This slight wobble in the centre is exactly what you want. The centre will continue setting from residual heat during cooling and will become completely firm after refrigeration.
Remove the roasting tray from the oven and allow the cheesecake to sit in the water bath for 30 minutes with the oven off and the door slightly ajar. This gradual temperature reduction prevents the sudden cooling that causes cracking. After 30 minutes, remove the tin from the water bath, discard the foil, and allow the cheesecake to cool completely at room temperature for a further 1 hour before refrigerating overnight or for a minimum of 6 hours.
Step Five: Make the Mocha Ganache Topping
Place 150g of finely chopped dark chocolate into a heatproof bowl. Add 1 teaspoon of instant espresso powder directly to the chocolate — adding it before the cream distributes it more evenly than adding it afterward. Heat 120ml of heavy cream in a small saucepan over medium heat until it reaches a gentle simmer with small bubbles forming around the edges and steam rising from the surface. Remove from heat immediately and pour over the chocolate.
Leave the cream and chocolate undisturbed for 60 seconds. The heat of the cream melts the chocolate without requiring stirring — disturbing the mixture too early cools the cream before it has time to melt the chocolate completely and produces a grainy, lumpy ganache. After 60 seconds, stir gently from the centre outward in slow circular motions until the mixture looks completely smooth, glossy, and uniform throughout with no visible chocolate pieces.
Add 1 tablespoon of unsalted butter and stir until fully melted and incorporated. The butter adds a silky sheen and a slightly richer flavour to the finished ganache. Allow the ganache to cool at room temperature for 20 to 30 minutes until it has thickened to a pourable but not runny consistency — it should pour slowly and coat the back of a spoon. If it cools too firm, warm briefly over a bowl of hot water and stir until loosened.
Step Six: Finish and Decorate
Remove the fully chilled cheesecake from the fridge and carefully release the springform tin sides. Run a thin knife warmed under hot water around the inside edge of the tin before releasing the clasp — this prevents the cold cheesecake from sticking to the sides and tearing the surface. Lift the tin ring away cleanly and place the cheesecake on a flat serving plate or cake board.
Pour the cooled ganache directly onto the centre of the cheesecake and use the back of a spoon to spread it gently to the edges, allowing a small amount to drip naturally over the sides at 2 to 3 points for a casual, elegant finish. The ganache should cover the entire top surface in a thin, even layer that sets into a glossy, mirror-like coat as it cools against the cold cheesecake surface. Do not spread too aggressively — one or two gentle strokes from the centre outward produces the cleanest result.
Arrange chocolate-covered espresso beans in a neat row or a loose cluster across the ganache surface. Dust very lightly with cocoa powder through a fine sieve over the espresso beans and the ganache for a subtle dark finish. Scatter a small number of chocolate shavings for additional texture. Refrigerate the decorated cheesecake for at least 20 minutes to allow the ganache to set completely before slicing. IMO, this rich creamy coffee cheesecake slice looks most impressive when sliced with a sharp knife dipped in hot water and wiped clean between each cut. 🙂
Why the Water Bath Makes Such a Difference
Have you ever baked a cheesecake without a water bath and found deep cracks running across the surface within minutes of it coming out of the oven? That cracking happens because dry oven heat sets the edges of the cheesecake too quickly, creating tension between the fast-setting exterior and the slower-setting centre. When the centre eventually cooks through and contracts, it pulls against the already-set edges and the surface tears.
A water bath eliminates this tension by surrounding the tin with steam and regulating the ambient temperature around the cheesecake to approximately 100°C — significantly lower than the oven air temperature. This gentle, even heat allows every part of the filling to set at the same rate without any single area rushing ahead of the others. The result is a perfectly smooth, uncracked surface every time, which is especially important for this latte flavored cheesecake dessert recipe where the ganache topping requires a flat, even surface to sit on correctly.
No-Bake Version for When You Need Something Faster
The no bake coffee cheesecake recipe version works brilliantly for occasions where you do not want to use the oven or need the cheesecake ready faster than the baked version allows.
For the no-bake version, replace the eggs and flour in the filling with 300ml of very cold heavy cream. Beat the cream separately to stiff peaks, then fold it gently through the beaten cream cheese, sugar, espresso mixture, sour cream, and vanilla. Pour into the chilled biscuit base and refrigerate for a minimum of 6 hours or overnight to set completely. The no-bake version sets through the fat content of the cream cheese and cream rather than through egg coagulation — the texture is lighter and more mousse-like than the baked version, but the coffee flavour is equally strong and the presentation looks identical.
Making the Chocolate Coffee Cheesecake Variation
The chocolate coffee cheesecake recipe easy variation uses the same base recipe with one significant addition — 80g of melted dark chocolate folded into the filling alongside the espresso mixture. The melted chocolate deepens the colour of the filling to a rich mocha brown and adds a dense, fudgy chocolate dimension beneath the coffee flavour.
Use this variation when you want the mocha coffee cheesecake cake recipe experience — a filling that tastes as much of dark chocolate as it does of espresso. The ganache topping remains the same, but the contrast between the chocolate-coffee filling and the dark ganache produces a more dramatically flavoured result than the standard version alone.
Espresso Cheesecake With Mocha Ganache at Home
10
servings25
minutes55
minutesThis coffee cheesecake combines a dark chocolate biscuit base with a dense, espresso-infused cream cheese filling baked low and slow using a water bath for a perfectly smooth, crack-free surface. Finished with a silky mocha ganache and chocolate espresso beans, it delivers a rich, deeply flavoured coffee dessert every time.
Ingredients
Chocolate biscuit base:
200g digestive biscuits, finely crushed
30g unsweetened cocoa powder
80g unsalted butter, melted
2 tablespoons caster sugar
Coffee cheesecake filling:
700g full-fat cream cheese, room temperature
200g caster sugar
3 large eggs, room temperature
200ml sour cream, room temperature
2 tablespoons instant espresso powder dissolved in 2 tablespoons hot water, cooled
1 teaspoon vanilla extract
1 tablespoon plain flour
Mocha ganache topping:
150g dark chocolate, finely chopped
120ml heavy cream
1 teaspoon instant espresso powder
1 tablespoon unsalted butter
Decoration:
Chocolate covered espresso beans
Cocoa powder for dusting
Chocolate shavings
- Crush digestive biscuits finely then mix with cocoa powder, sugar, and melted butter until evenly coated
- Press firmly into the base and 2.5cm up the sides of a 23cm springform tin
- Refrigerate the base for 20 minutes while preparing the filling
- Preheat oven to 160°C fan or 165°C conventional
- Wrap outside of springform tin tightly in two layers of heavy-duty foil
- Place wrapped tin inside a large roasting tray and set aside
- Beat room temperature cream cheese on medium speed for 2 minutes until completely smooth
- Add caster sugar and beat for 1 more minute until fully incorporated
- Add room temperature eggs one at a time on low speed beating for 20 seconds after each
- Add sour cream, vanilla extract, and plain flour and beat on low until just combined
- Add cooled espresso mixture and fold through gently with a spatula until uniform in colour
- Pour filling over chilled biscuit base and smooth the top completely flat
- Pour boiling water into the roasting tray around the tin to halfway up the sides
- Bake for 50 to 60 minutes until edges are set and centre wobbles slightly when nudged
- Turn oven off and leave cheesecake in the water bath with door ajar for 30 minutes
- Remove from water bath and cool at room temperature for 1 hour
- Refrigerate for a minimum of 6 hours or overnight
- Place finely chopped dark chocolate and espresso powder in a heatproof bowl
- Heat heavy cream until just simmering then pour over the chocolate
- Leave undisturbed for 60 seconds then stir gently from centre outward until smooth and glossy
- Add butter and stir until fully melted and incorporated
- Cool ganache at room temperature for 20 to 30 minutes until slow and pourable
- Remove chilled cheesecake from fridge and release springform tin sides carefully
- Run a warm knife around the edge before releasing the clasp
- Pour cooled ganache onto the centre and spread gently to the edges
- Allow a small amount to drip naturally over the sides at 2 to 3 points
- Arrange chocolate espresso beans across the ganache surface
- Dust lightly with cocoa powder through a fine sieve
- Scatter chocolate shavings for additional texture
- Refrigerate for 20 minutes to set the ganache before slicing and serving
Common Mistakes to Avoid
Using cold cream cheese: Cold cream cheese produces lumpy filling regardless of how long you beat it. Always bring it to genuine room temperature — at least 45 minutes out of the fridge — before starting.
Over-beating after adding eggs: Excess air in the filling causes dramatic puffing during baking followed by immediate collapse and cracking on cooling. Add eggs on low speed and beat only until just combined after each one.
Skipping the overnight chill: A cheesecake that has only chilled for 2 to 3 hours slices messily and the filling has not fully firmed. Always chill for a minimum of 6 hours — overnight is better and produces a noticeably cleaner, denser texture. :/
Rushing the ganache cooling time: Ganache poured too hot melts the cold cheesecake filling surface slightly and runs straight over the sides. Always cool the ganache to a slow, pourable consistency before applying it to a chilled cheesecake.
FAQs
Q1: Can I use filter coffee instead of espresso powder?
Yes — replace the espresso powder and hot water with 3 tablespoons of very strong brewed filter coffee, cooled completely before adding. The flavour is slightly less intense than espresso powder but still delivers a clear, pleasant coffee note throughout the filling. Avoid weak or medium-strength coffee — it adds moisture without meaningful flavour and produces a washed-out result.
Q2: Why did my cheesecake crack despite using a water bath?
Cracking despite a water bath usually happens because the oven temperature was too high, the foil barrier leaked and allowed water to enter the tin base, or the cheesecake cooled too quickly after baking. Check that your oven runs at the correct temperature using an oven thermometer, ensure the foil wraps tightly with no gaps, and always cool gradually with the oven door slightly ajar before removing completely.
Q3: Can I freeze this cheesecake?
Yes — the baked version freezes well for up to 2 months. Freeze the cheesecake without the ganache topping. Wrap the completely cooled, chilled cheesecake tightly in two layers of cling film and one layer of foil. Thaw overnight in the fridge before applying the ganache and decorating. Add the ganache and espresso bean decoration on the day of serving for the freshest appearance.
Q4: What biscuits work best for the base?
Digestive biscuits produce a classic, slightly honeyed base that pairs well with the coffee filling. Oreo cookies produce a darker, more intensely chocolate flavour. Speculoos or Biscoff biscuits add a spiced, caramel character that pairs particularly well with the espresso in the coffee dessert cheesecake ideas context. All three work well — choose based on the flavour profile you prefer.
Wrapping It Up
This coffee cheesecake recipe homemade version delivers a genuinely professional-quality result from a manageable process. Make the biscuit base and chill it, beat the cream cheese filling at room temperature, add eggs on low speed, use a water bath during baking, cool gradually, chill overnight, and finish with a mocha ganache. Those seven habits produce a perfect easy coffee flavored cheesecake recipe result every time.
Whether you make the classic baked version or the faster no-bake alternative, this cheesecake consistently impresses. Now go make one — and prepare for the silence that follows the first bite.