Your child has requested a Moana cake and now you are staring at a blank notepad wondering where to even begin. Been there. I made my niece a Disney Moana birthday cake last summer with zero professional cake decorating experience — just a steady hand, some food coloring, and this exact method. She cried happy tears. That is the standard we are aiming for here.
This easy Moana cake at home guide covers everything — the actual vanilla coconut cake layers, the buttercream frosting, the ocean wave effect, and all the tropical decorations that bring the whole Polynesian theme together beautifully. You do not need a piping degree or fondant sculpting skills. You just need this guide and a little patience.
Servings: 12 to 16 slices Prep Time: 45 minutes Bake Time: 30 to 35 minutes per layer Decorating Time: 1 to 1.5 hours Total Time: Approximately 3.5 to 4 hours (plus cooling)
What You Need — The Complete Ingredients List
This Moana themed cake design starts with a genuinely delicious tropical vanilla coconut base. Here is everything for a two-layer 20cm round cake:
For coconut vanilla cake layers:
- 3 cups all-purpose flour, sifted
- 2.5 teaspoons baking powder
- 1/2 teaspoon salt
- 225g unsalted butter, room temperature
- 2 cups granulated white sugar
- 4 large eggs, room temperature
- 1 cup full-fat coconut milk (from a can — not the carton drinking kind)
- 1/2 cup whole milk
- 2 teaspoons pure vanilla extract
- 1 teaspoon coconut extract
- 1/2 cup sweetened shredded coconut (fold in at the end)
Vanilla buttercream frosting:
- 450g unsalted butter, completely room temperature
- 5 to 6 cups powdered sugar, sifted
- 4 to 5 tablespoons heavy cream or whole milk
- 2 teaspoons pure vanilla extract
- 1/4 teaspoon salt
For the ocean wave decoration:
- Gel food coloring in ocean blue, teal, turquoise, and white
- 1 additional cup of buttercream (set aside before coloring for white waves)
For the tropical Moana cake decorations:
- Moana figurines or printed Moana cake toppers (purchased or printed at home)
- Edible pearl sprinkles or white sugar pearls
- Green fondant or buttercream for palm leaves (optional)
- Toasted coconut flakes for texture
- Tropical flowers made from fondant or purchased edible sugar flowers
- Blue and teal edible glitter or luster dust (optional but stunning)
FYI, gel food coloring is non-negotiable for the ocean effect. Liquid food coloring dilutes the buttercream and changes the consistency — gel gives you intense, vibrant color without adding any extra liquid to the frosting.
The Making Process — Every Step in Full Detail
Step 1: Bake the Coconut Vanilla Cake Layers
Preheat your oven to 175 degrees Celsius. Grease two 20cm round cake pans, line the bottoms with parchment paper circles, then grease the parchment and dust lightly with flour. Doing all three — grease, parchment, flour — guarantees the layers release without any tearing or sticking, which is especially important when you need clean, level layers for stacking and decorating.
Whisk the sifted flour, baking powder, and salt together in a medium bowl and set aside. In a separate small bowl or jug, combine the coconut milk, whole milk, vanilla extract, and coconut extract. Stir together and set aside. Having all your components measured and ready before you begin mixing the batter keeps the process smooth and prevents the common mistake of letting creamed butter sit too long before the wet and dry ingredients go in.
Beat the room-temperature butter in a stand mixer or with a handheld electric mixer on medium speed for two to three minutes until pale, fluffy, and visibly aerated. Add the granulated sugar and beat for another three minutes until the mixture looks almost white and very light. Scrape down the bowl after each addition. This extended creaming step builds the air structure that creates a tender, fine crumb in the finished cake layers.
Add the four room-temperature eggs to the creamed butter and sugar one at a time, beating for 30 seconds after each addition on medium speed. Room-temperature eggs emulsify smoothly into the fat without curdling — cold eggs cause the batter to look broken and lumpy, which affects the final texture. After all four eggs are in, the batter should look smooth, pale, and glossy.
Alternate adding the dry ingredients and the coconut milk mixture to the batter in three additions each — beginning and ending with the dry ingredients. Mix on the lowest speed after each addition, just until the flour disappears. Fold the sweetened shredded coconut into the finished batter by hand using a rubber spatula — two or three gentle folds is all it needs.
Divide the batter evenly between the two prepared pans — use a kitchen scale if you have one for perfect equality. Spread each to an even level. Bake at 175 degrees Celsius for 30 to 35 minutes until a toothpick inserted in the center comes out clean and the surface springs back when touched gently. Cool in the pans for ten minutes, then turn out onto wire racks to cool completely before any frosting or stacking.
Step 2: Make the Vanilla Buttercream Frosting
Beat 450g of completely room-temperature butter in your stand mixer on medium-high speed for four to five full minutes until it looks pale, whipped, and almost white. This extended beating before any sugar goes in creates an ultra-light, airy buttercream base that pipes and spreads significantly more smoothly than buttercream made with minimally beaten butter. Have you ever had buttercream that tasted greasy or heavy? Under-beaten butter is usually the culprit.
Add the sifted powdered sugar to the beaten butter in three to four additions, mixing on the lowest speed after each to prevent a powdered sugar cloud in your kitchen. After all the sugar is incorporated, add vanilla extract, salt, and four tablespoons of heavy cream. Increase the speed to medium-high and beat for another two to three minutes until the buttercream looks fluffy, cohesive, and spreadable.
The finished buttercream should hold soft peaks — firm enough to pipe but smooth enough to spread without tearing the cake surface. If it looks too stiff, add heavy cream one teaspoon at a time. If it looks too soft, add powdered sugar one tablespoon at a time. Reserve approximately one cup of plain white buttercream in a separate bowl for the wave highlights before adding any color.
Step 3: Level and Stack the Cake Layers
Once the cake layers are completely cool — and completely means no warmth when you hold your palm above them — use a long serrated knife to level the domed top of each layer. Place each cake on a flat surface and use a gentle sawing motion to slice off any risen dome, creating a perfectly flat surface. Level layers stack evenly and prevent the finished cake from leaning or sliding.
Place a small dab of buttercream on your cake board or serving plate — this acts as glue to prevent the bottom layer from sliding. Place the first cake layer flat-side down on the board. Add a generous layer of plain white buttercream — approximately half a centimeter thick — over the top surface of the first layer using an offset spatula. Spread it evenly to the edges.
Place the second cake layer on top, flat-side up. The flat bottom of the top layer creates the smoothest possible surface for frosting. Press down gently and evenly to ensure full contact with the buttercream filling layer. Check that the cake looks level from all angles before proceeding — adjust by pressing gently on the higher side if needed. Chill the stacked cake in the refrigerator for 20 minutes before applying the outer frosting.
Step 4: Apply the Crumb Coat
Apply a thin, even layer of plain white buttercream over the entire exterior of the chilled stacked cake — top and sides. This layer is called the crumb coat and its purpose is to trap all the loose crumbs from the cut cake surfaces so they do not appear in the final decorated layer. Use an offset spatula and cake scraper for the sides — do not worry about making this layer perfect.
Refrigerate the crumb-coated cake for 20 to 30 minutes until the buttercream feels firm and cold to the touch. Do not skip this chilling step. A chilled crumb coat provides a firm foundation for the final colored buttercream layers and prevents the crumbs from mixing into the ocean colors during the decorative application. This two-step frosting approach — crumb coat then final layer — is the difference between a professional-looking result and a crumby, streaky one.
Step 5: Create the Ocean Wave Buttercream Effect
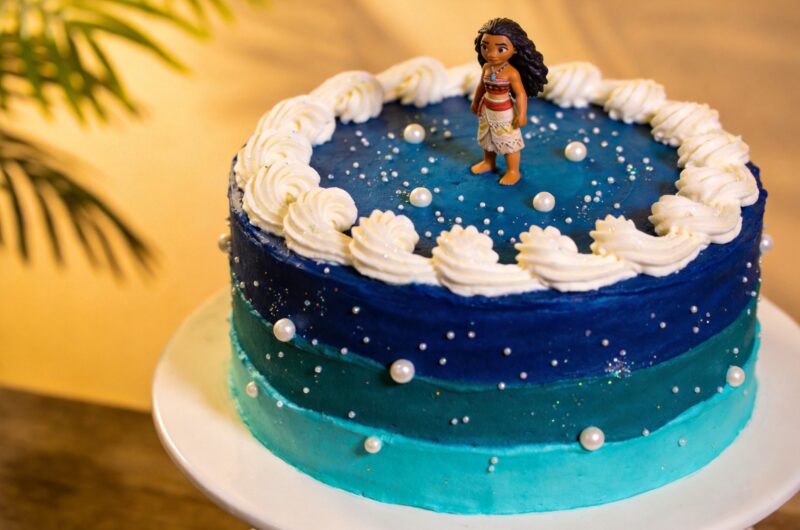
This is where the Moana ocean wave cake design really comes alive and where people assume you have professional skills when actually it just takes a little patience and the right technique. Divide your remaining buttercream into three to four portions. Color the one deep ocean blue using gel food coloring. Color teal. Colored a lighter turquoise. Keep the reserved cup plain white for wave highlights.
Apply the colored buttercreams around the side of the cake in irregular, overlapping horizontal bands — starting with the deep ocean blue at the bottom, moving through teal in the middle, and lighter turquoise toward the top. Do not apply them in perfect straight lines — use an offset spatula to smear and blend them onto the cake in uneven, organic patches that overlap and mix slightly at their edges. This creates the natural color variation of ocean water.
Use a cake scraper held against the side of the cake and rotated smoothly around the full circumference to blend the colors slightly together into a seamless gradient. One or two smooth passes with the scraper creates the ocean depth effect. For the top surface, spread the colors outward from the center in a circular ocean pattern using the tip of the offset spatula in sweeping motions.
Step 6: Add the Wave Texture and Highlights
Load the reserved white buttercream into a piping bag fitted with a small star or petal tip. Pipe small swirling, cresting wave shapes around the sides and top surface of the cake — concentrate them toward the upper portion of the sides and around the top edge where ocean meets shoreline. The white waves against the teal and blue background create the iconic Moana buttercream cake tutorial look that photographs beautifully from every angle.
Use a clean offset spatula or toothpick to drag the tips of the white piped waves gently sideways — this creates the characteristic foamy, breaking wave appearance rather than stiff piped shapes. A light touch and quick sideways motion are all it takes. Step back after each wave section and evaluate the overall composition before adding more. IMO, slightly fewer, larger waves look more dramatic and intentional than dozens of tiny ones covering every surface.
Add edible blue and teal luster dust or glitter over the ocean sections using a dry pastry brush in light, sweeping motions. The luster dust catches light and gives the ocean buttercream a shimmering, water-like quality that flat matte frosting cannot achieve. This one optional step — which takes under two minutes — elevates the visual impact of the cake from good to genuinely spectacular 🙂
Step 7: Add Tropical Moana Cake Decorations
Now add all the tropical Moana cake decorations that complete the theme. Press the Moana figurine or printed cake topper into the top surface of the cake. If using a printed topper, laminate it or place it in a topper holder to keep it upright and protected from the buttercream moisture.
Scatter edible pearl sprinkles or white sugar pearls across the ocean surface of the cake — these represent the shimmer of sunlight on water and add texture and visual interest to the buttercream ocean. Press them gently into the frosting so they adhere without sinking completely. A small cluster near Moana’s feet works beautifully — as if she is standing on sparkling water.
Add tropical sugar flowers, fondant palm leaves, or edible shells around the base of the cake or at the top edge if desired. These details are what make Moana birthday party cake ideas look cohesive and intentional rather than like a generic decorated cake. A few well-placed elements outperform a cake covered in every decoration available — restraint and composition matter in cake decorating just as they do in any visual art.
Decoration Approaches by Skill Level
Beginner — Buttercream Only
Skip fondant entirely. Use the ocean buttercream gradient method described above, add white wave piping, and finish with a Moana figurine topper and edible pearl sprinkles. This approach produces a genuinely beautiful cake that looks intentional and themed without requiring any advanced skills. Buttercream is significantly more forgiving than fondant — mistakes are easy to smooth over and redo.
Intermediate — Buttercream Plus Fondant Accents
Use buttercream for the main ocean surface and add small fondant decorations — palm leaves, tropical flowers, or a fondant spiral shell at the base. Roll green fondant thin and cut leaf shapes with a knife or leaf cutter. Press a toothpick down the center of each leaf to create a vein. These small additions take fifteen minutes and add significant visual detail to the Moana fondant cake ideas theme.
Advanced — Full Fondant Cover
Cover the crumb-coated cake in a smooth layer of white fondant first. Then paint the ocean gradient directly onto the fondant using gel food coloring mixed with a small amount of clear alcohol (vodka works and evaporates quickly) applied with a soft brush. This painted fondant technique produces the most dramatic, smooth ocean effect but requires confidence and practice with fondant handling.
Tips for Making This Cake Ahead
Planning a party and want to get ahead of the stress? Here is the timeline that works:
- Two to three days before: Bake the cake layers, wrap tightly in plastic wrap, and freeze or refrigerate until needed
- One to two days before: Make buttercream, stack and crumb coat the cake, refrigerate overnight
- Day of party: Apply final ocean buttercream, add wave details, add all decorations, photograph, serve
- Figurines and toppers: Add these on the day of serving — never ahead of time, as moisture from the fridge affects printed toppers and plastic figurines can sometimes react with buttercream over extended contact
Disney Moana Cake That Looks Professional at Home
15
servings45
minutes35
minutesThis Moana Cake features moist coconut vanilla layers filled and frosted with ocean-gradient vanilla buttercream in deep blue, teal, and turquoise, finished with white wave piping, edible pearl sprinkles, and a Moana figurine topper. Serving 12 to 16 people, it delivers a stunning tropical themed birthday cake at home.
Ingredients
Coconut Vanilla Cake:
3 cups all-purpose flour, sifted
2.5 teaspoons baking powder
1/2 teaspoon salt
225g unsalted butter, room temperature
2 cups granulated white sugar
4 large eggs, room temperature
1 cup full-fat canned coconut milk
1/2 cup whole milk
2 teaspoons vanilla extract
1 teaspoon coconut extract
1/2 cup sweetened shredded coconut
Vanilla Buttercream:
450g unsalted butter, room temperature
5 to 6 cups powdered sugar, sifted
4 to 5 tablespoons heavy cream
2 teaspoons vanilla extract
1/4 teaspoon salt
Ocean Wave Decoration:
Gel food coloring in ocean blue, teal, turquoise, and white
1 reserved cup plain white buttercream for waves
Decorations:
Moana figurine or printed cake topper
Edible pearl sprinkles or white sugar pearls
Edible blue and teal luster dust or glitter
Tropical fondant or sugar flowers (optional)
Green fondant for palm leaves (optional)
- Preheat oven to 175 degrees Celsius and prepare two 20cm round cake pans with grease, parchment, and flour
- Whisk flour, baking powder, and salt together in a bowl, then combine coconut milk, whole milk, vanilla, and coconut extract in a separate jug and set both aside
- Beat room-temperature butter for two to three minutes until pale and fluffy, then add sugar and beat three more minutes until almost white
- Add eggs one at a time, beating 30 seconds after each, then alternate adding dry ingredients and coconut milk mixture in three additions each on the lowest speed
- Fold sweetened shredded coconut into the finished batter by hand, then divide evenly between the two pans and bake at 175 degrees Celsius for 30 to 35 minutes until a toothpick comes out clean
- Cool layers in pans for ten minutes, then transfer to wire racks to cool completely
- Beat 450g room-temperature butter for four to five minutes until pale and whipped, then add sifted powdered sugar in additions, followed by vanilla, salt, and heavy cream, beating until fluffy
- Reserve one cup of plain white buttercream for wave highlights before adding any color
- Level both cake layers with a serrated knife, stack with a buttercream filling layer between them, then apply a thin crumb coat over the entire exterior and refrigerate for 20 to 30 minutes
- Divide remaining buttercream into portions and color them deep ocean blue, teal, and turquoise using gel food coloring
- Apply the colored buttercreams in overlapping, irregular horizontal bands around the sides and top, then smooth with a bench scraper in one clean rotation
- Pipe white buttercream wave shapes around the upper sides and top edge using a star or petal tip, then drag the tips sideways gently to create a breaking wave effect
- Brush edible blue and teal luster dust lightly over the ocean sections, then add Moana figurine, pearl sprinkles, tropical flowers, and any additional decorations
- Refrigerate until 30 to 45 minutes before serving, then add any final figurines or printed toppers immediately before presenting
Frequently Asked Questions
Q1: Do I need Moana fondant figurines or can I use plastic ones? Plastic Moana figurines from toy stores or purchased cake toppers work perfectly and are significantly easier than making fondant ones from scratch. Simply wash plastic figurines thoroughly, dry completely, and press them into the top of the cake. Edible printed toppers on wafer paper are another excellent option — they lie flat, look professional, and require zero skill to apply. Save fondant sculpting for when you have practiced the basics first.
Q2: What is the best way to get smooth ocean blue buttercream? The key to smooth, vibrant ocean buttercream is using gel food coloring rather than liquid, allowing the colored buttercream to rest for 15 minutes after coloring before applying — the color deepens significantly during this rest — and using a bench scraper pulled cleanly around the side of the cake in one smooth motion. Color the buttercream slightly lighter than your target shade since it darkens as it sits. Start with less color and add gradually.
Q3: Can I make a Moana cake using a box mix instead of from scratch? Absolutely — use a white or vanilla box mix and add one teaspoon of coconut extract and half a cup of sweetened shredded coconut to the batter. Replace the water in the box instructions with equal amounts of full-fat canned coconut milk. The result tastes significantly more tropical and coconutty than the standard box mix version while still being genuinely easy to prepare.
Q4: How far in advance can I decorate the Moana cake? You can fully decorate the cake — including the ocean buttercream, waves, and fixed decorations — up to 24 hours before the party. Store it covered in the refrigerator and bring it to room temperature for 30 to 45 minutes before serving. Add any figurines, printed toppers, or fresh flowers on the day of the party rather than in advance, as moisture can affect these elements during refrigerator storage.
Q5: What size cake is best for a Moana birthday party? Two 20cm round layers serves 12 to 16 people generously and provides enough surface area to display the ocean decoration and Moana topper with visual impact. For larger parties of 20 or more, bake three layers instead of two — same recipe, same method, just one more layer of batter and slightly more buttercream for filling. A tiered cake with a smaller tier on top also works beautifully for a more dramatic Moana cake ideas birthday presentation.
Make This Cake and Watch the Birthday Magic Happen
This easy Moana cake at home project is genuinely more achievable than it looks. The ocean gradient buttercream takes practice to describe but about ten minutes to actually execute. The wave piping takes another ten. The decorations take five. What you end up with is a cake that looks like it required professional skill but actually required patience, good food coloring, and this guide.
Make the cake layers ahead. Chill the crumb coat. Take your time with the ocean colors. And let your kid’s face when they see it be the only review that matters.