I served this vegan chocolate mousse cake recipe at a birthday dinner and told nobody it was plant-based until after the plates were cleared. Three people asked for the recipe before they even knew it contained no dairy, no eggs, and no animal products whatsoever. That is the highest possible compliment a vegan dessert can receive.
This easy dairy free chocolate mousse cake uses aquafaba — the liquid from a can of chickpeas — whipped to a glossy meringue-like foam that creates the mousse’s airy texture without a single egg. Combined with melted dark chocolate and full-fat coconut cream, it produces a genuinely rich, creamy chocolate mousse cake that tastes indulgent rather than virtuous. Nobody needs to know it is healthy unless you want them to.
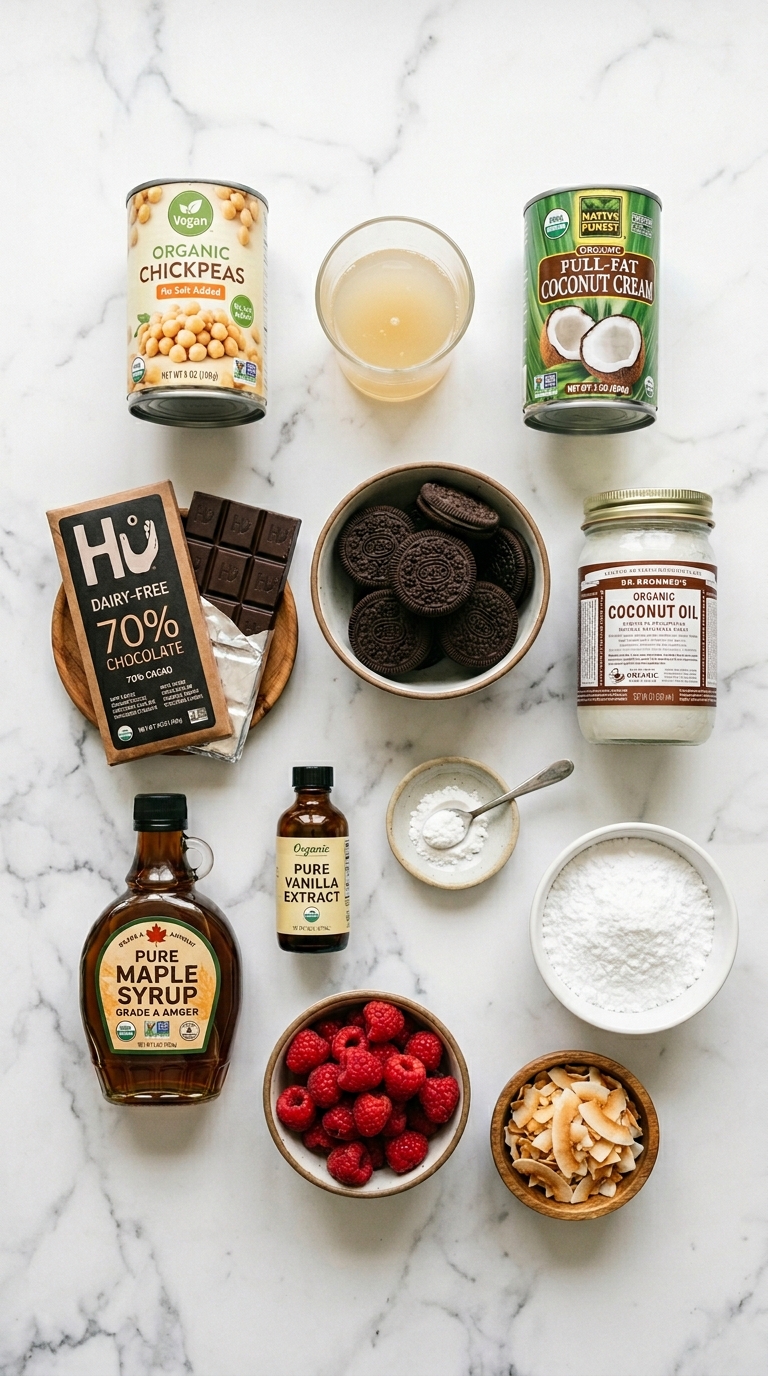
What You’ll Need (Ingredients)
Everything here comes from a well-stocked supermarket. The aquafaba and coconut cream are the two items that make this recipe work.
For chocolate biscuit base:
- 180g (about 12) Oreo cookies or chocolate digestive biscuits — check packaging for vegan certification
- 60g (4 tablespoons) coconut oil, melted
- 1 tablespoon cocoa powder
- 1 tablespoon maple syrup
Vegan chocolate mousse layer:
- 300g (10.5 oz) good quality dark chocolate — minimum 70 percent cocoa, dairy-free
- 400ml (1 can) full-fat coconut cream, refrigerated overnight
- 150ml (2/3 cup) aquafaba — the liquid from one 400g can of unsalted chickpeas
- 1/4 teaspoon cream of tartar
- 3 tablespoons icing sugar
- 2 teaspoons vanilla extract
- 2 tablespoons maple syrup
For the chocolate ganache topping:
- 150g (5.3 oz) dairy-free dark chocolate, finely chopped
- 100ml (1/3 cup) full-fat coconut cream
- 1 tablespoon maple syrup
For decoration:
- Fresh raspberries or strawberries
- A light dusting of cocoa powder
- Coconut flakes, lightly toasted
- Dark chocolate shavings
How to Make It — Full Step-by-Step Process
Step One: Make the Chocolate Biscuit Base
Place 180g of Oreo cookies or chocolate digestive biscuits into a food processor and pulse until completely crushed to a fine, uniform sandy texture. Add 1 tablespoon of cocoa powder and pulse once more for 5 seconds to combine. Transfer the crushed biscuit mixture to a bowl, add 60g of melted coconut oil and 1 tablespoon of maple syrup, and mix with a fork until every crumb is evenly coated. The mixture should hold together when pressed firmly between your fingers.
Line a 20cm (8 inch) springform tin with parchment on the base only. Tip the biscuit mixture into the tin and press firmly and evenly across the entire base using the flat bottom of a glass or the back of a spoon. Press down hard — a loosely packed base crumbles when sliced rather than cutting cleanly. The coconut oil firms as it cools and binds the crumbs into a solid, sliceable layer.
Place the pressed base in the freezer for 20 minutes to firm completely before adding the mousse. A cold, firm base holds its shape when the mousse layer goes on top and prevents the two from mixing at the boundary layer. Meanwhile, prepare the mousse components in the next steps.
Step Two: Melt the Dark Chocolate
Break 300g of dairy-free dark chocolate into pieces and place in a heatproof bowl set over a saucepan of barely simmering water. The base of the bowl must not touch the water — the gentle steam provides indirect heat that melts the chocolate slowly and evenly without scorching. Stir occasionally with a spatula as the chocolate melts.
Once the chocolate has melted completely and looks smooth and glossy, remove the bowl from the heat and allow it to cool at room temperature for 10 to 15 minutes. The chocolate needs to be warm — not hot — when combined with the other mousse components. Hot chocolate added to the whipped aquafaba deflates the foam immediately, producing a flat, dense filling rather than the airy mousse texture this creamy plant based chocolate mousse cake recipe depends on.
Test the temperature of the cooled chocolate by touching the bowl with your palm. It should feel pleasantly warm rather than hot — approximately body temperature or slightly above. If it still feels hot after 15 minutes, allow another 5 minutes before proceeding.
Step Three: Whip the Coconut Cream
Open the can of full-fat coconut cream that has been refrigerated overnight. Scoop only the solid white cream from the top of the can into a cold mixing bowl — avoid the watery liquid at the bottom. Overnight refrigeration causes the fat in the coconut cream to separate and solidify, making it whippable. Room temperature coconut cream does not whip and produces a thin, runny result regardless of how long you beat it.
Beat the solid coconut cream on medium-high speed for 2 to 3 minutes until it reaches soft, billowy peaks. Add 2 teaspoons of vanilla extract and 2 tablespoons of maple syrup and beat for a further 30 seconds to incorporate. The whipped coconut cream adds richness and a subtle tropical creaminess to the mousse that full-fat coconut milk alone cannot provide.
Set the whipped coconut cream aside in the fridge while you prepare the aquafaba meringue. Keeping it cold prevents it from softening before it combines with the chocolate, which preserves the airy structure throughout the finished mousse layer.
Step Four: Whip the Aquafaba
Drain one 400g can of unsalted chickpeas and measure out 150ml of the liquid — this is your aquafaba. The liquid must come from unsalted chickpeas — the salt in salted chickpea liquid prevents the aquafaba from reaching full volume during whipping. Pour the aquafaba into a clean, completely grease-free mixing bowl. Add 1/4 teaspoon of cream of tartar.
Begin whisking the aquafaba on medium speed using a hand mixer or stand mixer. After about 1 minute, the liquid will turn foamy and opaque. Increase to high speed and add 3 tablespoons of icing sugar gradually, one tablespoon at a time. Continue whisking on high for 4 to 6 minutes until the aquafaba reaches stiff, glossy peaks that hold their shape when you stop the mixer and lift the beaters.
Aquafaba takes significantly longer to reach stiff peaks than egg whites — approximately 5 to 7 minutes total compared to 3 to 4 minutes for eggs. However, once it reaches stiff peaks, it holds its structure reliably and produces the same airy mousse quality as egg-based meringue. FYI — the aquafaba meringue is the technical centrepiece of this eggless chocolate mousse cake recipe, and getting it to stiff peaks is non-negotiable for the final texture.
Step Five: Combine the Mousse Components
Pour the cooled melted chocolate into the bowl of whipped coconut cream. Fold together gently using a large spatula in wide, slow circular motions until no streaks of white cream remain visible. Work gently and deliberately — the goal is to combine the two without deflating the air whipped into the coconut cream. The mixture should look smooth, dark, and slightly glossy when fully combined.
Add one-third of the stiff aquafaba meringue to the chocolate-coconut cream mixture and fold using the same gentle circular motions. This first addition lightens the dense chocolate mixture and makes it easier to incorporate the remaining meringue without deflating it. After the first addition looks mostly combined, add the remaining two-thirds of the meringue in one portion and fold until no white streaks remain.
Stop folding as soon as the mousse looks uniform throughout. Over-folding knocks out the air bubbles that give the mousse its light, airy texture and produces a denser, heavier result. The finished mousse should look thick but airy — almost like a soft, chocolate cloud that holds its shape when scooped but flows slightly at the edges.
Step Six: Assemble the Cake
Remove the chilled biscuit base from the freezer. Pour the finished chocolate mousse directly onto the frozen base in one slow, steady pour. Tap the tin gently on the counter twice to level the mousse and release any large air bubbles from the surface. Use an offset spatula to smooth the top completely flat — a flat top surface produces the cleanest ganache application in the final decoration step.
Place the assembled cake in the fridge for a minimum of 4 hours. The mousse needs this full chilling time to firm from a pourable, airy foam into a slice-able, structurally stable layer that holds its shape when the springform ring is removed. Overnight chilling produces an even firmer, more refined result — the cold temperature allows the coconut fat in the mousse to solidify further and creates a noticeably denser, more luxurious texture.
Do not rush this chilling time. A mousse layer that has only chilled for 1 to 2 hours cuts messily and collapses slightly when the springform ring releases. A fully chilled mousse holds its shape perfectly, slices cleanly, and maintains the tall, elegant profile that makes this rich vegan chocolate mousse layer cake look so impressive on the plate.
Step Seven: Make and Apply the Ganache
Place 150g of finely chopped dairy-free dark chocolate into a heatproof bowl. Heat 100ml of full-fat coconut cream in a small saucepan over medium heat until it reaches a gentle simmer with small bubbles forming at the edges. Pour the hot coconut cream over the chopped chocolate immediately. Leave undisturbed for 60 seconds, then stir gently from the centre outward until the mixture looks completely smooth, glossy, and uniform. Add 1 tablespoon of maple syrup and stir through.
Allow the ganache to cool at room temperature for 20 to 25 minutes until it thickens to a slow, pourable consistency that coats the back of a spoon without running straight off. If it cools too thick, place the bowl briefly over warm water and stir until loosened. If it remains too runny after 25 minutes, refrigerate for 5-minute intervals, stirring between each, until it reaches the right consistency.
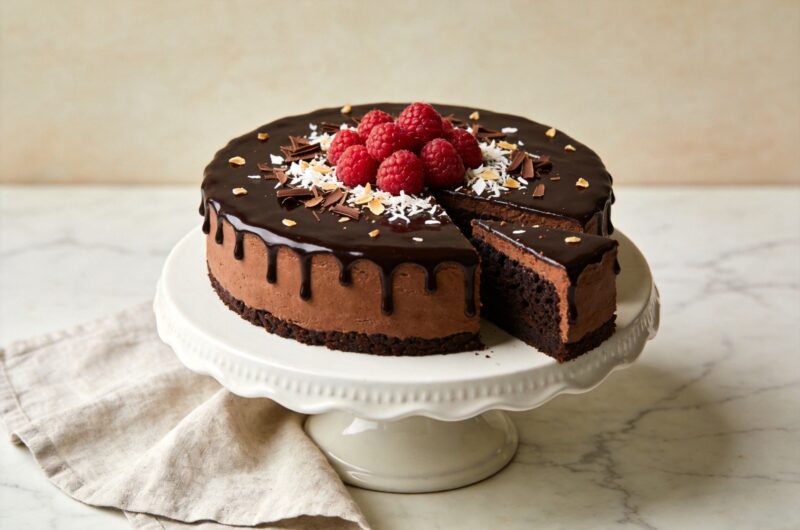
Remove the fully chilled mousse cake from the fridge and carefully release the springform ring. Run a thin knife warmed under hot water around the inside edge of the ring before releasing to prevent the mousse from sticking and tearing. Pour the cooled ganache onto the centre of the chilled mousse and use the back of a spoon to spread it gently to the edges, allowing a small amount to drip naturally over the sides in 2 to 3 places.
Why Aquafaba Works So Well as an Egg Replacement
Have you ever wondered how a liquid that comes from a can of chickpeas can possibly replicate the structural role of egg white in a mousse? The answer lies in the proteins and starches that leach from the chickpeas into the cooking liquid during the canning process. These compounds behave remarkably similarly to egg white albumin when agitated — they trap air bubbles, denature slightly under mechanical stress, and form a stable foam structure that holds volume over time.
The cream of tartar added during whipping lowers the pH of the aquafaba and mimics the effect that acidity has on egg white — it tightens the foam structure and produces stiffer, more stable peaks that resist deflating. The result is a meringue-like foam that produces genuine airiness in the healthy vegan chocolate dessert cake without any animal products at all.
Making It Gluten-Free
The gluten free vegan chocolate cake recipe version requires only one substitution. Replace the standard Oreo cookies or chocolate digestive biscuits with certified gluten-free chocolate biscuits — several brands produce excellent options. All other ingredients in this recipe are naturally gluten-free when using pure dark chocolate without barley malt extract, which some brands include. Always check the chocolate packaging for gluten-containing ingredients before buying.
Decoration and Serving Ideas
The no dairy chocolate mousse cake homemade style decoration works best through contrast — the dark ganache top benefits from bright, colourful, fresh elements that add visual interest and a flavour contrast to the deep chocolate.
Fresh fruit: Raspberries, sliced strawberries, or passion fruit seeds all add acidity and brightness that cut directly through the richness of the chocolate mousse.
Toasted coconut flakes: Scattered lightly over the ganache, they add crunch and a subtle tropical flavour that complements the coconut cream base of the mousse.
Dark chocolate shavings: Use a vegetable peeler along the edge of a chocolate block to produce thin, curling shavings that add an elegant professional finish.
Cocoa powder: A light dusting through a fine sieve across the entire top surface adds a subtle matte finish that makes the ganache look deep, rich, and impressive.
Common Mistakes to Avoid
Not refrigerating the coconut cream overnight: Room temperature coconut cream does not whip. Without overnight refrigeration, the fat and liquid do not separate, and the cream cannot reach the volume or consistency needed for the mousse. Always plan ahead and refrigerate the can the evening before you make this recipe.
Using salted aquafaba: Salt prevents the aquafaba proteins from forming a stable foam. Always use the liquid from unsalted chickpeas. If you only have salted chickpeas, rinse them thoroughly before draining and discard that liquid — use fresh water instead and make a simple syrup separately.
Folding too aggressively: Every fold after the aquafaba goes into the chocolate mixture deflates some of the air that took 6 minutes to whip in. Use the minimum number of folds needed to eliminate visible white streaks and stop immediately. :/
Serving before fully chilled: A mousse layer chilled for less than 4 hours slices messily and the layers separate when the springform ring releases. The full chilling time is what creates the structural integrity the cake needs to look and serve properly.
The Best Vegan Birthday Chocolate Cake From Scratch
12
servings30
minutes4
hoursThis vegan chocolate mousse cake uses whipped aquafaba and coconut cream folded with melted dark chocolate to create a genuinely airy, rich mousse layer over a chocolate biscuit base. Finished with a dairy-free ganache and fresh fruit, it delivers a stunning, fully plant-based chocolate cake that impresses absolutely everyone.
Ingredients
Chocolate biscuit base:
180g Oreo cookies or chocolate digestive biscuits, crushed
60g coconut oil, melted
1 tablespoon cocoa powder
1 tablespoon maple syrup
Vegan chocolate mousse:
300g dairy-free dark chocolate (70% minimum), melted and cooled
400ml full-fat coconut cream, refrigerated overnight
150ml aquafaba from one 400g can of unsalted chickpeas
1/4 teaspoon cream of tartar
3 tablespoons icing sugar
2 teaspoons vanilla extract
2 tablespoons maple syrup
Chocolate ganache topping:
150g dairy-free dark chocolate, finely chopped
100ml full-fat coconut cream
1 tablespoon maple syrup
Decoration:
Fresh raspberries or strawberries
Cocoa powder for dusting
Toasted coconut flakes
Dark chocolate shavings
- Crush Oreo cookies or chocolate digestive biscuits finely in a food processor
- Add cocoa powder and pulse briefly to combine
- Mix crushed biscuits with melted coconut oil and maple syrup until evenly coated
- Press firmly into the base of a lined 20cm springform tin
- Freeze for 20 minutes until completely firm
- Melt dairy-free dark chocolate in a heatproof bowl over barely simmering water
- Remove from heat and cool at room temperature for 10 to 15 minutes
- Scoop solid coconut cream from the refrigerated can into a cold mixing bowl
- Beat coconut cream on medium-high speed for 2 to 3 minutes until soft billowy peaks form
- Add vanilla extract and maple syrup and beat for 30 seconds more
- Refrigerate whipped coconut cream while preparing the aquafaba
- Pour 150ml aquafaba into a clean grease-free mixing bowl
- Add cream of tartar and begin whisking on medium speed until foamy and opaque
- Increase to high speed and add icing sugar gradually one tablespoon at a time
- Continue whisking on high for 4 to 6 minutes until stiff glossy peaks form
- Fold cooled melted chocolate into the whipped coconut cream gently until no white streaks remain
- Add one-third of the aquafaba meringue and fold gently to loosen the chocolate mixture
- Add remaining meringue and fold until just combined with no visible white streaks
- Remove frozen biscuit base from freezer
- Pour finished mousse onto the base in one steady pour
- Tap tin gently on the counter twice and smooth the top flat
- Refrigerate for a minimum of 4 hours or overnight
- Place finely chopped dairy-free dark chocolate in a heatproof bowl
- Heat coconut cream until simmering then pour over the chocolate
- Leave undisturbed for 60 seconds then stir from centre outward until smooth
- Add maple syrup and stir through
- Cool ganache at room temperature for 20 to 25 minutes until slow and pourable
- Remove chilled mousse cake from fridge and release springform ring carefully
- Pour cooled ganache onto the centre and spread gently to the edges
- Allow small drips to fall naturally over 2 to 3 points around the edge
- Arrange fresh raspberries or strawberries across the ganache surface
- Dust lightly with cocoa powder through a fine sieve
- Scatter toasted coconut flakes and chocolate shavings across the top
- Refrigerate for 20 minutes to set the ganache before slicing and serving
FAQs
Q1: Can I use coconut milk instead of coconut cream?
No — standard coconut milk does not contain enough fat to whip or provide the richness the mousse needs. Full-fat coconut cream specifically is required for this recipe. The key indicator is fat content — coconut cream typically contains 20 to 30 percent fat while coconut milk contains significantly less. Look for cans labelled specifically as coconut cream rather than coconut milk.
Q2: How long does this cake keep in the fridge?
The assembled vegan birthday chocolate cake recipe easy version keeps well in the fridge for up to 3 days in a sealed container or covered with cling film. Beyond 3 days, the aquafaba foam structure begins to break down slightly and the mousse loses some of its airy quality. The biscuit base may also soften progressively from moisture in the mousse over extended storage.
Q3: Can I freeze this cake?
Yes — freeze without the fresh fruit decoration. Wrap the fully chilled and ganache-topped cake tightly in cling film and freeze for up to 1 month. Thaw in the fridge overnight rather than at room temperature — slow thawing preserves the mousse texture much better than quick room temperature thawing. Add fresh fruit decoration after thawing immediately before serving.
Wrapping It Up
This vegan chocolate mousse cake recipe delivers a genuinely stunning, richly flavoured plant-based dessert using aquafaba, coconut cream, and quality dairy-free dark chocolate. Whip the aquafaba to true stiff peaks, fold the mousse components gently to preserve the air, chill the base before adding the mousse, chill the assembled cake for the full 4 hours, and apply the ganache to a cold surface. Those five habits produce a perfect result every time.
Whether you make it for a vegan birthday celebration or simply want the most impressive no-bake chocolate dessert your kitchen has ever produced — this cake genuinely delivers. Now go open a can of chickpeas with more excitement than you have ever opened a can of chickpeas before. IMO it is completely justified.