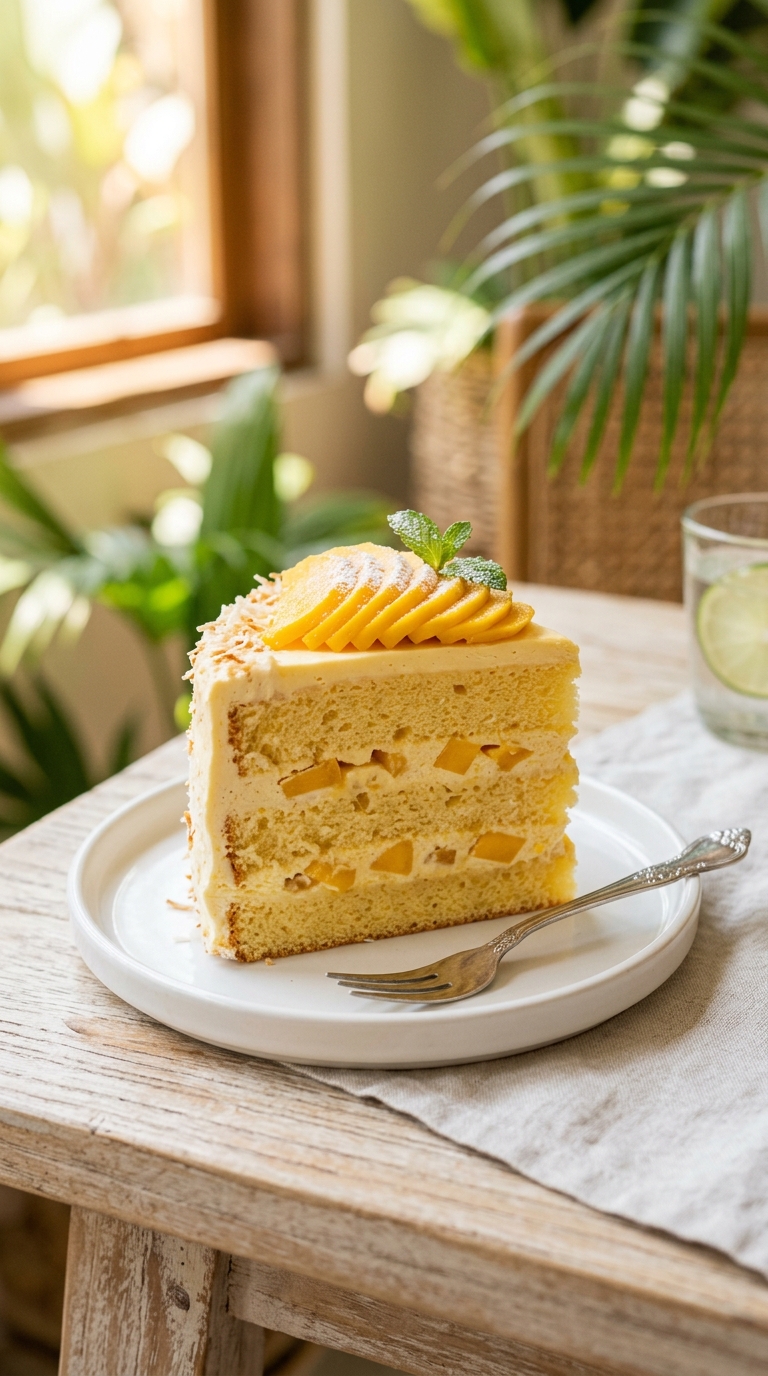
I made this mango cream chiffon cake recipe for a family lunch last August and watched a normally quiet table suddenly become very animated over dessert. The sponge was impossibly light, the mango cream filling tasted fresh and tropical, and the whole cake had that particular delicacy that makes you eat a second slice while telling yourself it barely counts as a real dessert. Chiffon cake psychology is a fascinating thing.
This fluffy mango chiffon cake homemade version uses the classic separated-egg Japanese chiffon technique combined with real mango puree baked directly into the sponge. The result is a genuinely light, airy cake with a natural golden colour, a tender crumb that resists drying out, and a tropical mango flavour that carries through every layer without tasting artificial or manufactured. Paired with a whipped mango cream filling and fresh mango slices, it looks and tastes like something you would pay dearly for in a Japanese-style patisserie.
What You’ll Need (Ingredients)
Everything here comes from a well-stocked supermarket. Fresh ripe mangoes are the only ingredient worth tracking down specifically — the quality of the mango affects the entire cake.
For mango chiffon sponge:
- 6 large eggs, separated — room temperature
- 120g (1 cup) plain flour, sifted twice
- 30g (3 tablespoons) cornstarch — this is critical for tenderness
- 150g (3/4 cup) caster sugar — divided into 80g for the yolks and 70g for the whites
- 80ml (1/3 cup) mango puree — made from approximately 1 large ripe mango blended until smooth
- 60ml (1/4 cup) vegetable oil
- 1 teaspoon vanilla extract
- 1/2 teaspoon cream of tartar
- 1/4 teaspoon salt
Whipped mango cream filling:
- 400ml (1.75 cups) double cream or heavy whipping cream, very cold
- 4 tablespoons icing sugar, sifted
- 3 tablespoons mango puree — very cold
- 1/2 teaspoon vanilla extract
For assembly and decoration:
- 2 large ripe mangoes, peeled and sliced into thin, even pieces
- 2 tablespoons mango jam or extra mango puree for brushing between layers
- Extra mango slices for the top decoration
- A light dusting of icing sugar through a fine sieve
How to Make It — Full Step-by-Step Process
Step One: Make the Mango Puree
Begin by making your mango puree before anything else, because it needs to be at room temperature for the sponge and very cold for the whipped cream — and having it ready in advance lets you divide and chill one portion while the other reaches room temperature naturally.
Peel and roughly chop 2 to 3 large ripe mangoes. Place the flesh into a blender or food processor and blend on high for about 30 seconds until completely smooth with no fibrous pieces remaining. Pass the puree through a fine mesh sieve if you want an extra-smooth result without any stringy mango fibre — this step is optional but produces a noticeably cleaner, more refined flavour in the final cream.
You need approximately 160ml of mango puree total — 80ml for the sponge batter and 3 tablespoons for the whipped cream filling. Measure out the two portions separately. Place the cream portion in a sealed container in the fridge immediately so it chills thoroughly while you bake the sponge. Leave the sponge portion at room temperature on the counter.
Ripe mango selection matters enormously here. A fragrant, deep yellow Alphonso or Ataulfo mango produces the most intensely flavoured, naturally sweet puree. A pale, underripe mango produces a watery, slightly sour puree that does not carry through the sponge clearly. FYI — taste the puree before using it. If it tastes excellent straight from the blender, it will taste excellent in the finished cake. If it tastes flat, the cake will too.
Step Two: Preheat Oven and Prepare the Tin
Set your oven to 160°C (320°F) fan-forced or 165°C (330°F) conventional. Chiffon cakes bake at a lower temperature than standard sponge cakes — the longer, lower bake allows the delicate airy structure to set gradually and completely without the exterior overbaking before the interior is done.
For this recipe, use a 20cm (8 inch) round chiffon cake tin or a standard 20cm round cake tin. Here is an important rule for chiffon cake tins specifically — do not grease the sides of the tin. This sounds completely counterintuitive, but it is essential. Chiffon batter clings to the ungreased sides of the tin as it rises, using the surface for grip as it climbs upward during baking. A greased tin causes the batter to slide back down rather than holding its height, producing a significantly shorter, denser result.
Line only the base of the tin with a parchment circle. Leave the sides completely bare. If you use a tube or angel food cake tin — which works especially well for this soft mango sponge chiffon cake recipe — do not grease the central tube either.
Step Three: Separate Eggs and Prepare Two Bowls
Separate all 6 eggs carefully, placing yolks in one large bowl and whites in a second completely clean, dry, grease-free bowl. Any fat contamination in the whites prevents them from whipping to the stiff, glossy peaks this recipe requires. Use a piece of clean eggshell to scoop out any dropped yolk rather than a spoon.
Allow both bowls to sit at room temperature for 15 minutes before using. Room temperature egg whites whip to a larger, more stable volume than cold whites from the fridge. Room temperature yolks incorporate into the oil and mango puree more smoothly and evenly than cold ones. This waiting period is genuinely worth the time it takes, and you can use it productively to measure out all your other ingredients.
Step Four: Make the Mango Yolk Batter
Add 80g of caster sugar to the egg yolk bowl. Whisk vigorously for about 1 minute until the mixture turns pale yellow and slightly thickened. Add 60ml of vegetable oil in a slow, steady stream while whisking continuously — this gradual addition emulsifies the oil into the yolk mixture rather than having it pool on the surface.
Add 80ml of room temperature mango puree and 1 teaspoon of vanilla extract to the bowl. Whisk until fully combined and uniform. The mixture should look glossy, smooth, and a warm golden-orange colour throughout.
Sift 120g of plain flour and 30g of cornstarch directly into the yolk mixture. Add 1/4 teaspoon of salt. Fold with a spatula in wide, gentle circular motions until no dry streaks remain and the batter looks smooth and slightly thick. The cornstarch dilutes the protein content of the flour — less protein means less gluten development, which produces the tender, almost melting crumb that distinguishes this light airy mango chiffon cake dessert from a standard flour-based sponge. Set the yolk batter aside.
Step Five: Whip the Egg White Meringue
Add 1/2 teaspoon of cream of tartar to the bowl of room temperature egg whites. Begin whisking on medium speed. The cream of tartar stabilises the meringue structure by lowering the pH of the whites, which makes the foam more resilient during folding and less likely to deflate unexpectedly.
Whisk until the whites look opaque and foamy — about 1 minute at medium speed. Begin adding the remaining 70g of caster sugar gradually, one tablespoon at a time, while the mixer runs continuously on medium-high. Never add all the sugar at once — adding it gradually allows each addition to dissolve into the foam before the next goes in, building a stable, uniform meringue rather than a grainy, over-sweetened one.
Continue whisking after all the sugar has been added for approximately 2 minutes until the meringue reaches stiff, glossy peaks. Test by stopping the mixer and lifting the beaters — the peaks should stand completely upright without drooping or falling to one side. They should look white, shiny, and smooth with no visible graininess. A properly whipped meringue at this stage is what produces the signature airy, almost cloud-like texture of a genuine Japanese style mango chiffon cake recipe.
Step Six: Fold Meringue Into Yolk Batter
Add one-third of the stiff meringue to the mango yolk batter. Fold using a large spatula with confident, wide circular motions — scraping from the bottom and folding over the top. This first addition acts as a lightening agent for the thick yolk batter, loosening it enough to accept the remaining delicate meringue without crushing its structure.
Add the remaining two-thirds of the meringue in one addition. Now fold very gently and deliberately, turning the bowl as you work. Count your folds — most batters need 35 to 45 folds total to reach full incorporation without significant deflation. Stop the moment no white streaks of meringue remain visible in the batter.
The finished batter should look pale golden, airy, and slightly mousse-like in texture. It should pour smoothly rather than dropping in thick chunks. If it looks dense and heavy, the meringue deflated too much during folding — either from over-folding or from under-whipped meringue at the start. If it pours beautifully with a light, flowing consistency, the folding went exactly right.
Step Seven: Bake the Chiffon Sponge
Pour the finished batter into the ungreased tin in a steady, slow stream. Do not tap the tin on the counter — tapping causes the delicate air bubbles in the batter to burst before baking. Instead, use a skewer or toothpick to draw 3 slow circles through the batter from the outside edge to the centre, which removes any large air pockets without disrupting the overall structure.
Place the tin on the centre rack of the preheated oven. Bake for 50 to 58 minutes without opening the door at any point during the first 40 minutes. The long bake at low temperature allows the sponge to rise slowly and set completely from the outside in. A chiffon cake that comes out of the oven with a slight wobble in the centre is underbaked and will collapse when cooled — it needs to feel completely set and spring back fully when pressed.
At 50 minutes, open the oven and press the centre of the cake gently. It should spring back completely and immediately. Insert a skewer — it should come out completely clean with no batter or moist crumbs. If any batter clings to the skewer, bake for another 5 to 8 minutes and check again.
Step Eight: Cool the Cake Upside Down
Remove the tin from the oven and immediately invert it upside down on a wire rack. If you used a tube tin, invert it over the central tube or over a bottle neck. If you used a regular round tin, rest the inverted tin on two equal-height objects — such as two upturned glasses — so air can circulate underneath.
This upside-down cooling is not optional and cannot be replaced with standard right-side-up cooling. Chiffon cake is too delicate to support its own weight while still hot. Cooling right-side-up causes the still-setting sponge to collapse under its own weight, producing a dense, shrunken cake rather than the tall, airy result the recipe promises. The upside-down position allows gravity to work in the cake’s favour — pulling the sponge downward and keeping it stretched tall while the structure cools and firms.
Leave the cake to cool completely upside down for a minimum of 1 hour. After 1 hour, run a thin flexible knife carefully around the inside edge of the tin, pressing against the tin rather than the cake to avoid tearing the sides. Invert onto a flat surface and remove the parchment from the base. The cake should release cleanly with smooth, even sides.
Step Nine: Slice the Cake Into Layers
Use a long serrated bread knife to slice the completely cooled chiffon sponge into three equal horizontal layers. Mark the halfway point around the outside of the cake with toothpicks inserted at equal intervals as a guide before cutting — this ensures the layers come out even rather than wedge-shaped. Cut slowly and steadily using a gentle sawing motion, rotating the cake as you cut. Rushing this step produces uneven layers that make the assembled cake lean to one side.
Separate the three layers and lay them out on a clean surface. Note which layer is the top, the middle, and the base. The flattest, most uniform layer works best as the base. The layer with the most even surface works best as the top.
Step Ten: Make the Whipped Mango Cream
Pour 400ml of very cold double cream into a cold mixing bowl. Add 4 tablespoons of sifted icing sugar and 1/2 teaspoon of vanilla extract. Beat on medium-high speed for about 90 seconds until the cream reaches soft peaks — not stiff peaks at this stage.
Add the 3 tablespoons of cold mango puree to the soft-peak cream. Continue beating for another 30 to 60 seconds until the cream reaches firm peaks. The mango puree adds both flavour and colour — the cream turns a soft golden-orange and develops a fresh, fragrant tropical quality that genuinely tastes like fruit rather than flavouring.
Stop beating as soon as firm peaks form. Over-beaten cream loses its smooth, glossy quality and develops a slightly grainy texture that is impossible to reverse. Firm peaks mean the cream holds its shape when you lift the beaters but still looks smooth and glossy rather than dry or chunky.
Step Eleven: Assemble the Moist Mango Cream Layered Chiffon Cake
Place the base layer on a flat serving plate. Brush the surface lightly with mango jam or a thin layer of extra mango puree using a pastry brush — this adds a fresh fruit moisture barrier that prevents the cream from soaking directly into the sponge and making it soggy.
Spread approximately one-third of the whipped mango cream over the first layer in an even layer, reaching to the edges. Arrange a single layer of thinly sliced fresh mango pieces across the cream, pressing them gently so they sit flat without sliding.
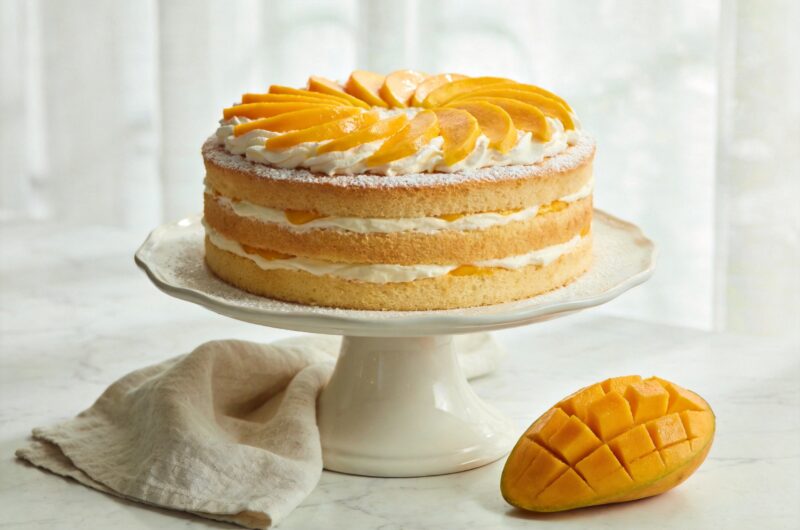
Place the middle layer on top, brush with mango jam again, and repeat the cream and mango process. Position the top layer last and press very gently to seat it flat. Apply the remaining whipped mango cream to the top surface in a generous, even layer — the sides of this cake are intentionally left bare for the classic Japanese chiffon presentation style, which shows off the beautiful pale layers.
Arrange fresh mango slices decoratively across the top of the cream in overlapping fans or in a loose, generous cluster. Dust very lightly with icing sugar through a fine sieve for a soft, elegant finish. Refrigerate for at least 30 minutes before slicing to allow the layers to settle and the cream to firm slightly. IMO, this summer mango chiffon cake dessert ideas presentation — bare sides showing the layers, fresh mango on top, clean icing sugar dusting — looks more beautiful than any frosted cake with the same effort. 🙂
Why the Chiffon Method Produces Such a Distinctive Texture
Have you ever tasted a chiffon cake and immediately noticed that the texture feels genuinely different from both butter cake and standard sponge? That distinctive quality comes from the combination of oil, meringue, and flour in proportions that exist nowhere else in baking.
Oil-based batters produce a more tender, moist crumb than butter-based ones because oil stays liquid at room temperature while butter solidifies. This means a chiffon cake cut from the fridge still feels soft and moist, while a butter-based cake cut cold feels noticeably dense and slightly waxy. The meringue folded into an oil-based yolk batter creates a combined structure that is both moist and airy simultaneously — a combination that butter cake achieves less reliably.
The tropical mango cream cake chiffon style result also stays fresh significantly longer than standard sponge cakes. The oil content preserves moisture in the crumb for 2 to 3 days after baking, which makes this recipe genuinely practical for occasions where the cake needs preparation ahead of time.
Tips for a Perfect Chiffon Cake Every Time
Never grease the sides of the tin. The batter must grip the sides to rise properly. This rule overrides every other cake-baking instinct you have. Ignore it and the cake will not reach its full height.
Cool upside down without exception. Every minute the hot cake spends right-side-up risks collapse. Invert immediately after removing from the oven and leave undisturbed for the full hour.
Use very ripe, very fragrant mangoes. The mango flavour in this recipe comes entirely from fresh fruit — there is no extract or artificial flavouring to compensate for underripe fruit. The quality of the mango determines the quality of the final cake more directly than almost any other ingredient.
Fold the meringue in two stages. The first stage loosens. The second stage incorporates. Attempting to fold all the meringue in at once risks deflating it significantly before it distributes through the batter evenly.
Fluffy Mango Chiffon Cake With Whipped Mango Cream
12
servings35
minutes55
minutesThis mango cream chiffon cake combines a light, airy mango-infused oil-based chiffon sponge with a whipped mango cream filling and layers of fresh sliced mango. Using the classic separated-egg technique for maximum lift and tenderness, it delivers a genuinely tropical, delicate cake that tastes as beautiful as it looks.
Ingredients
Mango chiffon sponge:
6 large eggs, separated, room temperature
120g plain flour, sifted twice
30g cornstarch
150g caster sugar (80g for yolks, 70g for whites)
80ml mango puree, room temperature
60ml vegetable oil
1 teaspoon vanilla extract
1/2 teaspoon cream of tartar
1/4 teaspoon salt
Whipped mango cream:
400ml double cream, very cold
4 tablespoons icing sugar, sifted
3 tablespoons mango puree, very cold
1/2 teaspoon vanilla extract
Assembly and decoration:
2 large ripe mangoes, peeled and sliced thinly
2 tablespoons mango jam or extra mango puree for brushing
Icing sugar for dusting
- Blend ripe mango flesh until completely smooth to make the puree
- Divide puree into 80ml for the sponge and 3 tablespoons for the cream
- Refrigerate the cream portion immediately and leave the sponge portion at room temperature
- Preheat oven to 160°C fan or 165°C conventional for at least 20 minutes
- Line only the base of a 20cm round tin with parchment — leave sides completely ungreased
- Separate 6 room temperature eggs placing yolks in one bowl and whites in a second clean bowl
- Allow both bowls to sit at room temperature for 15 minutes
- Whisk egg yolks with 80g caster sugar for 1 minute until pale and slightly thickened
- Add vegetable oil in a slow stream while whisking continuously
- Add room temperature mango puree and vanilla extract and whisk until fully combined
- Sift plain flour and cornstarch into the yolk mixture and add salt
- Fold gently until no dry streaks remain and the batter looks smooth
- Add cream of tartar to the egg white bowl and begin whisking on medium speed until foamy
- Add remaining 70g caster sugar gradually one tablespoon at a time while mixer runs on medium-high
- Continue whisking until stiff glossy peaks form that stand upright without drooping
- Add one-third of meringue to yolk batter and fold confidently to loosen
- Add remaining meringue and fold gently for 35 to 45 folds until just combined
- Pour batter slowly into the ungreased tin without tapping
- Draw 3 slow circles through the batter with a skewer to remove large air pockets
- Bake on centre rack for 50 to 58 minutes without opening door in the first 40 minutes
- Test with a skewer — completely clean means done, any batter means 5 to 8 more minutes
- Remove from oven and immediately invert tin upside down onto a wire rack
- Cool completely inverted for a minimum of 1 full hour
- Run a thin knife around the inside edge of the tin after cooling
- Invert onto a flat surface and remove parchment from the base
- Slice the cooled sponge into 3 equal horizontal layers using a serrated knife
- Beat very cold double cream with icing sugar and vanilla to soft peaks
- Add cold mango puree and beat to firm peaks — stop immediately when peaks hold
- Place base layer on a serving plate and brush with mango jam
- Spread one-third of whipped mango cream evenly across the first layer
- Arrange a single layer of fresh mango slices across the cream
- Place middle layer on top, brush with mango jam, and repeat cream and mango
- Place top layer on and press gently to seat flat
- Spread remaining whipped mango cream across the top surface only
- Arrange fresh mango slices decoratively across the cream topping
- Dust lightly with icing sugar through a fine sieve
- Refrigerate for at least 30 minutes before slicing and serving
Common Mistakes to Avoid
Greasing the tin sides: A greased tin causes the batter to slide rather than climb during baking. The result is a flat, dense cake that does not resemble chiffon in either texture or appearance. Leave the sides completely ungreased every single time.
Under-whipping the meringue: Soft or medium-peak meringue deflates too quickly during folding and produces a dense, heavy batter that bakes into a solid, un-airy result. Always whip to true stiff peaks before folding — the test is peaks that stand upright without drooping.
Opening the oven during the first 40 minutes: Chiffon cake structure is fragile until it reaches approximately 75 percent of its total baking time. Opening the door before this point drops the temperature and can cause the partially set structure to sink in the middle before it has firmed enough to support itself. :/
Rushing the cooling time: One hour is the minimum cooling time upside down. The sponge continues setting during cooling and needs the full hour to firm completely before it can support its own weight. Removing from the tin before full cooling produces a collapsed, dense base layer.
FAQs
Q1: Can I use canned mango puree instead of fresh?
Yes — good quality canned mango puree works well in both the sponge batter and the whipped cream filling. Look for canned Alphonso mango puree from an Indian grocery store, which delivers an intensely flavoured, naturally sweet result. Avoid canned mango in syrup — drain and blend it, but the flavour will be noticeably less fragrant than fresh or pure canned puree.
Q2: Why did my chiffon cake collapse after cooling?
Collapse almost always happens for one of three reasons. The cake was not cooled upside down immediately after removing from the oven. The cake was underbaked and the structure had not fully set before cooling began. Or the oven temperature was too high and the exterior set before the interior had time to rise fully. Always cool inverted for the full hour and verify doneness with a clean skewer before removing from the oven.
Q3: Can I make this cake without a tube pan?
Yes — a standard 20cm round cake tin works fine as long as you do not grease the sides. The tube pan allows the centre of the cake to bake more evenly and produces a taller rise because the central tube conducts heat to the interior of the batter. A standard round tin produces a slightly lower, slightly less evenly baked result, but the flavour and texture remain excellent.
Q4: How long does this cake keep after assembly?
The assembled mango cream chiffon cake keeps well in the fridge for up to 2 days. Beyond 2 days, the whipped mango cream begins to weep slightly and the fresh mango on top deteriorates in appearance. The unassembled chiffon sponge on its own keeps well wrapped in cling film at room temperature for up to 3 days or in the freezer for up to 1 month.
Wrapping It Up
This mango cream chiffon cake recipe delivers a genuinely exceptional, light, tropical dessert using careful technique and quality fresh ingredients. Make the mango puree from ripe fragrant fruit, whip the meringue to true stiff peaks, fold in two stages, bake at low temperature without opening the door, cool inverted for a full hour, and assemble with cold whipped mango cream immediately before serving. Those six habits produce a perfect whipped mango cream chiffon cake recipe result every single time.
Whether you make it for a summer gathering, a birthday celebration, or simply because you want the most elegant light dessert your kitchen has ever produced — this cake genuinely delivers. Now go find the ripest mangoes available and get baking.